Safety Data Sheets: Information that Could Save Your Life
By Brian Rohrig December 2015
On September 15, 2014, a high school chemistry teacher in Colorado intended to demonstrate the characteristic emission spectra of metal ions with a flame test large enough for the entire classroom to watch. The different colored flames produce the so-called rainbow effect, which would certainly impress the students. Unfortunately, in this instance, four students were injured. All four suffered burns, one seriously.
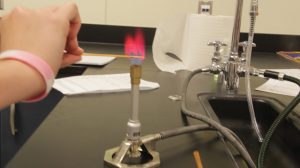
Methanol flame tests are typically performed by placing 5–7 grams of a metal chloride in a glass Petri dish and then adding 7–10 milliliters (mL) of methanol. After turning down the lights, the instructor lights the mixture, and the class observes the flame test color. But demonstrators are cautioned not to add more methanol to the Petri dish after starting the demonstration—the mistake this teacher made.
The flame quickly traveled back up into the bottle and ignited the rest of the alcohol. Pressure built up within the bottle, as the temperature of the gases produced in this chemical reaction quickly increased, and the bottle spewed a fiery stream of alcohol at a distance of 12 feet (3.6 meters), hitting a student in the chest.
In September and October 2014, a total of 22 students and two adults were injured throughout the United States in four separate incidents involving methanol used in rainbow demonstrations.
Could these accidents have been prevented? Where can teachers (and students) find the type of information needed to use chemicals in a safe and responsible fashion? Fortunately, there is a system in place to provide ready access to this type of information. Every chemical has its own Safety Data Sheet (SDS), formerly known as a Material Safety Data Sheets (MSDS), containing a wealth of information in a simple, easy-to-read format. Especially prominent within each SDS are safety precautions needed to handle the chemical properly, as well as any potential health hazards.
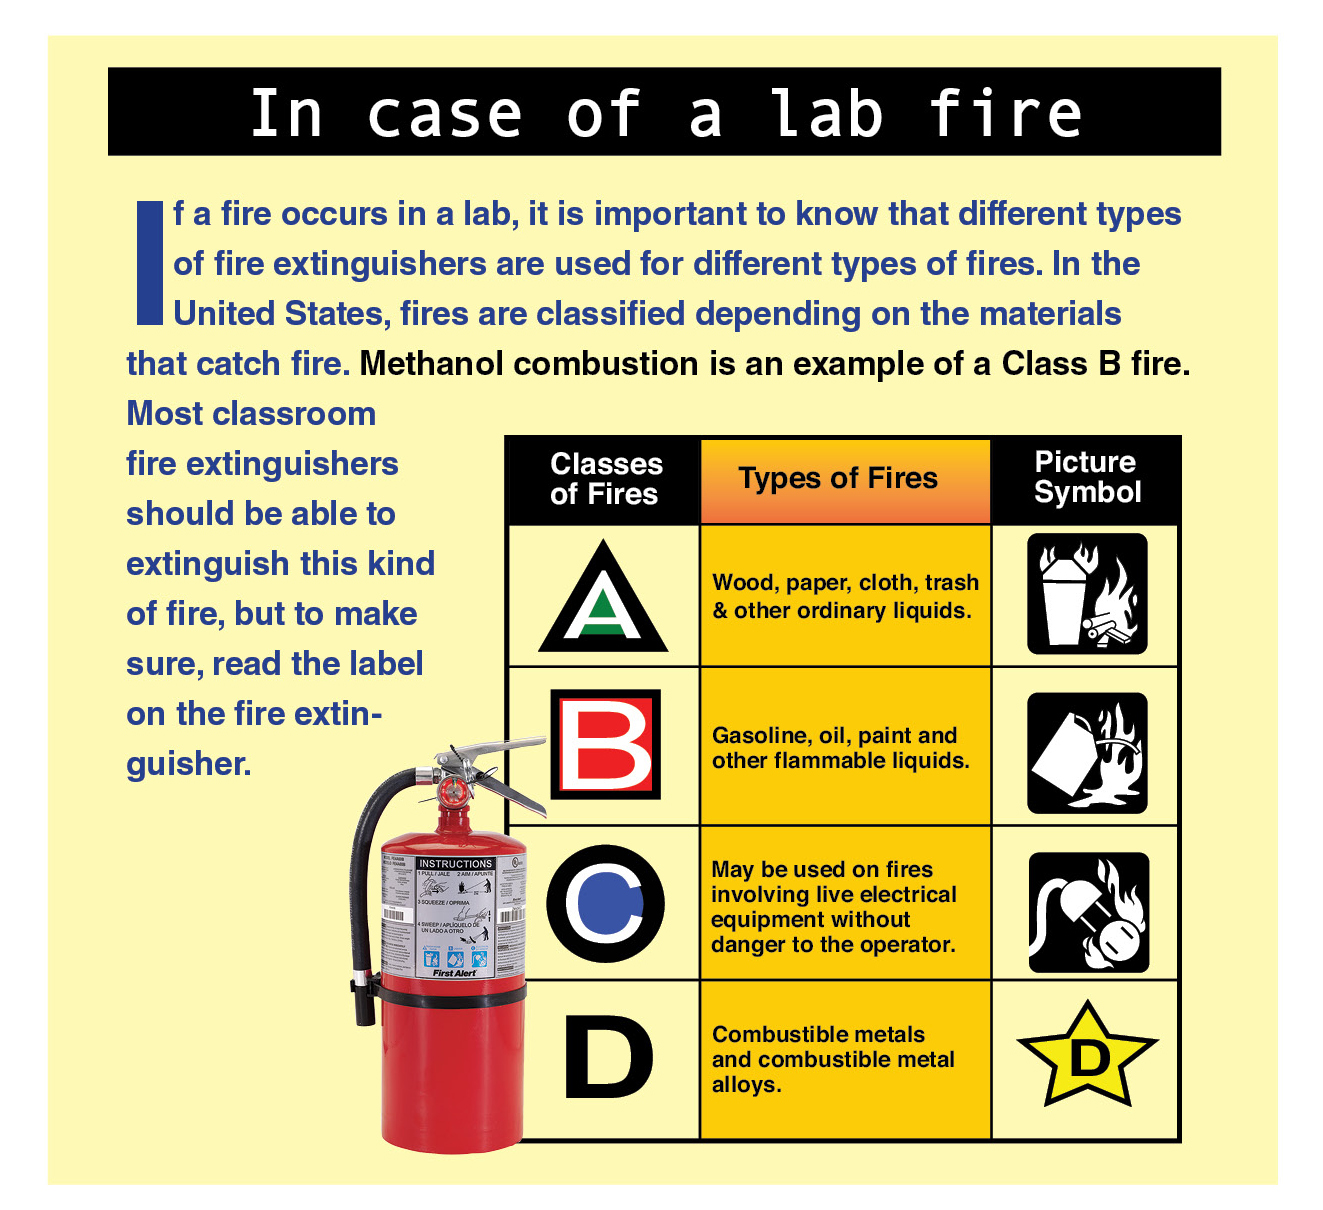
Understanding the hazards of chemicals
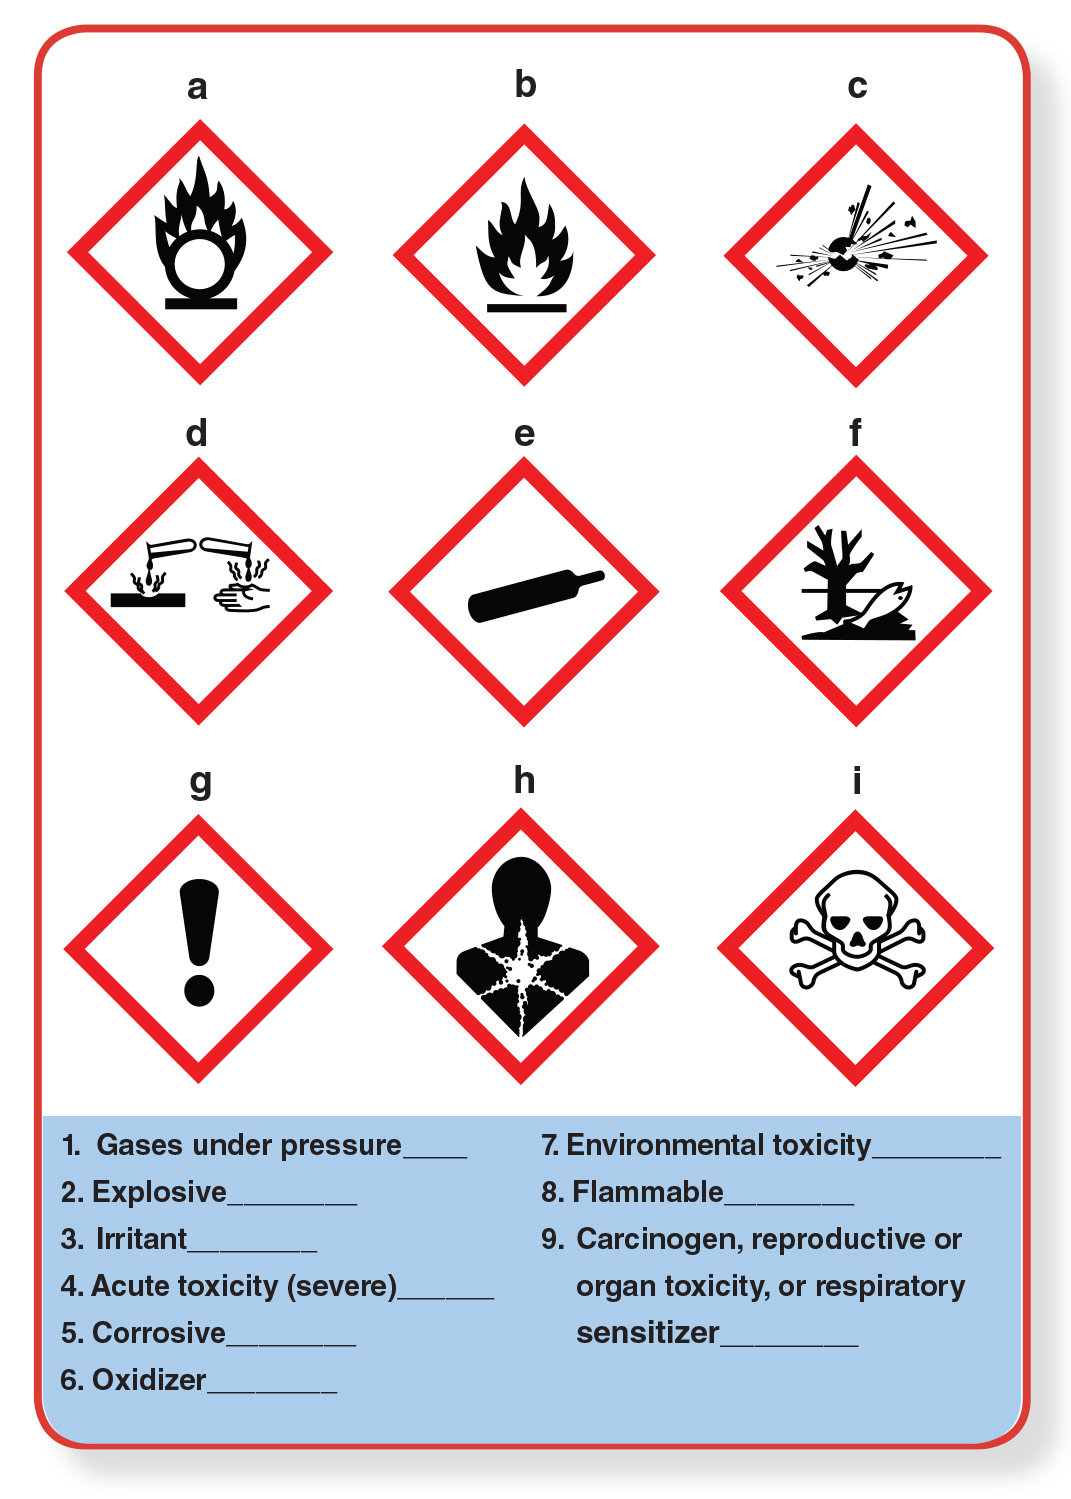
If you ever read the labels of chemical products, you may have noticed a lot of symbols. The use of these symbols is a direct result of recent efforts to modernize and standardize the way chemicals’ potential hazards are labeled. One update is the adoption of a uniform set of pictograms developed by the United Nations, which is used throughout the world. Quiz yourself on the left to see if you can match these symbols with their warnings.
An SDS meets the requirements of the Occupational Safety and Health Administration (OSHA), a U.S. federal agency created to ensure a safe work environment for all employees. OSHA mandates that all workers exposed to chemicals have the right to know about the potential hazards of these chemicals. Although OSHA regulations apply only to workers, state laws typically extend similar protections to students. So when your teacher orders chemicals for the lab, each chemical will come shipped with an SDS, either in written or electronic form. Having an SDS on hand for each chemical you use in the lab is not just a good idea—it’s the law.
The SDS for any particular chemical is written by the supplier or manufacturer of that chemical. There is a great deal of motivation for these companies to be thorough and accurate, as any incomplete or false information could lead to serious harm by the user, not to mention a lawsuit. But an SDS does not address the possible hazards that could occur as a chemical reaction moves forward, and the constituents and concentrations of the chemicals involved change.
Using methanol safely
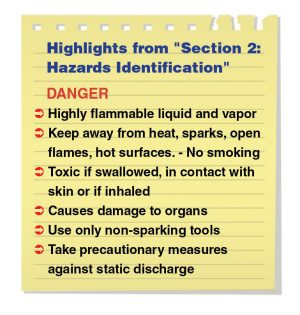
Let’s look at an example of an SDS for methanol and see if it contains information that could have helped to prevent the tragedies described above. Section 2 of the SDS is labeled “Hazards Identification.” A typical listing for methanol under this section may read as shown on the left.
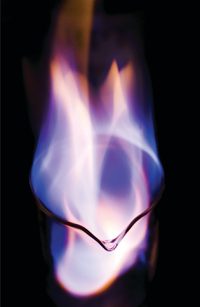
By reading the information contained in the SDS, the highly flammable nature of methanol is revealed. It is so flammable that there is a direct warning to avoid open flames and even sparks.
Although the label says that both the liquid and vapor are flammable, the liquid itself does not actually burn. When a liquid is ignited, it is the vapors on top of the liquid that burn. For a liquid to be considered flammable, it needs to evaporate quickly so that enough vapors can form above the surface of the liquid to support combustion. It is these vapors that will ignite, if enough heat is applied.
Many accidents involving methanol occur because it is poured onto an open flame. The same precaution against pouring any substance onto an open flame should be followed.
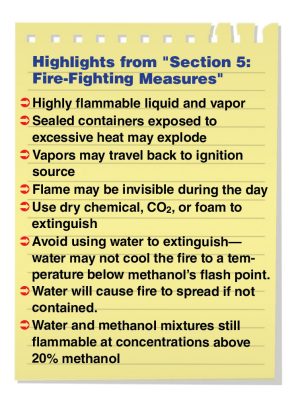
Even though most people should know better than to pour a flammable liquid onto an open flame, sometimes even trained professionals make this mistake with methanol, with disastrous consequences. Read through section 5 of the SDS on the left to see if you can figure out why this mistake may occur.
Because methanol burns with a clear, clean flame, it is often difficult to see this flame in the daytime. As stated in the SDS, the flame may appear invisible during the day. If you are performing a demonstration where a methanol flame is produced and then the flame dies down, you might be tempted to add more, thinking that the fire has gone out. This could be a tragic mistake.
Flash point and autoignition temperature
Methanol does not have to be poured directly onto a flame to produce unintended results. On September 3, 2014, a demonstrator at a science museum in Reno, Nev., attempted to conduct a flame tornado demonstration on a rotating platform that makes a vortex composed of flames. He poured some additional methanol onto cotton balls in a dish after the flames had apparently gone out, but the cotton balls were still smoldering and instantly re-ignited when the methanol was added. The flame traveled up into the bottle (as described in the SDS), spraying the flaming liquid into the audience. Thirteen people were injured, mostly children.
How is it possible to ignite methanol without an actual flame? To answer that question, we need to look at Section 9 of the SDS for methanol (see below).
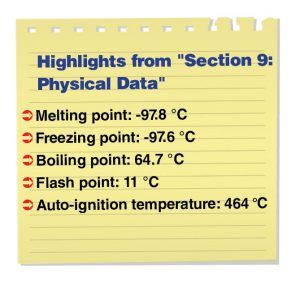
If you examine the data above (which is only a small portion of what is contained in the SDS for this section), you will notice the terms “flash point” and “autoignition temperature.” The flash point is the temperature at which the vapors above a liquid ignite if an outside ignition source, such as a spark or flame, comes near.
For example, if a beaker of methanol is at a temperature below its flash point, you cannot set it afire, even if you put an open flame to it. So, at 10 °C and below, methanol will not catch on fire. But once it reaches 11 °C—its flash point—you can set it on fire if you light it.
As a liquid warms, the average kinetic energy of its molecules increases. Because more molecules have enough kinetic energy to escape the attractive forces holding them together in the liquid phase, its evaporation rate increases, producing more vapor. The flash point occurs when a sufficient concentration of vapor has accumulated above the liquid, which, in combination with oxygen, will burn if ignited. Remember: Only vapors burn, not liquids.
When the flash point is reached, the vapors will ignite, but the fire will not be sustained, because there is not enough vapor present to sustain combustion. This ignition is still very dangerous, as a quick burst of flame can produce severe burns, and if other combustible substances are nearby, they can also catch on fire.
A more useful value is the fire point, which is the point at which a flammable liquid will not only catch on fire if lit but will also keep burning for five seconds. The fire point is typically only a few degrees higher than the flash point.
If methanol is at or above its fire point, it will continue to burn when lit. Under most laboratory conditions, methanol will be above its fire point, so when lit, it will continue to burn. Although the fire point is not included on the SDS, it is important to know how it differs from the flash point.
The autoignition temperature is the temperature at which a substance will burst into flames without an outside ignition source, such as a spark or a flame. At the auto-ignition temperature, spontaneous combustion occurs. According to the SDS for methanol, the auto ignition temperature is 464 °C. So, when the methanol was poured onto the smoldering cotton balls, if they were at a temperature above 464 °C, the methanol would instantly burst into flames on contact. Substances do not need flames to catch on fire—they only need a sufficient amount of heat along with air.
Considering the number of students who take high school chemistry, the number of students who were involved in accidents in a chemistry class is relatively small, and of the accidents that occur, most are relatively minor.
The number of students injured in science labs is smaller than those injured in sports. This good safety record is due to science teachers being vigilant about enforcing safety rules in the laboratory. So, the next time your chemistry teacher tells you to put your goggles on, make sure you comply, as he or she is only looking out for your safety.
While every accident in the chemistry lab cannot be avoided, the recent incidents with methanol likely could have been avoided, had the experimenters familiarized themselves with the safety information contained in an SDS. Anytime chemicals are used in the laboratory, there are risks involved, but these risks can be minimized by understanding the chemicals involved. It is often said that a little knowledge is a dangerous thing, but when it comes to chemicals, a little knowledge can save your life!
Selected references
Tinnesand, M. Material Safety Data Sheets: Passports to Safety? ChemMatters, Oct 2006, pp 18–19.
The ANSI Standardized MSDS Format. Ben Meadows Tech Facts, Document No. 250:
https://www.benmeadows.com/refinfo/techfacts/techpdf/msds_format_250.pdf [accessed Sept 2015].
History of the MSDS. James R. Macdonald Laboratory, July 14, 2009: http://jrm.phys.ksu.edu/safety/kaplan.html [accessed Sept 2015].
Improving Chemistry Demonstration Safety. Chemical & Engineering News, Nov 17, 2014: http://cen.acs.org/articles/92/i46/Improving-Chemistry-Demonstration-Safety.html [accessed Sept 2015].
Brian Rohrig is a science writer who lives in Columbus, Ohio. His most recent ChemMatters article, “Eating with Your Eyes: The Chemistry of Food Colorings,” appeared in the October/November 2015 issue.
Answers to quiz: 1.e; 2.c;, 3.g; 4.i; 5.d; 6.a; 7.f; 8.b; 9.h
See also How to Make Chemistry Classroom Demonstrations and Experiments Safer (Chemical & Engineering News, 93(46), pp 37-39).