;void(0);)
Downloadables:
Presenter's Guide (PDF) | Student Worksheet (PDF)
Question to investigate
Which will shine the brightest: a hot or cold glowstick? (Video shown in class)
Which will glow the longest: a room temperature or cold glowstick? (Conducted at home)
Chemistry concepts
- Molecules in hot water move faster than molecules in cold water.
- During a chemical reaction, atoms rearrange and bond together in different groupings.
- Faster moving molecules (warmer temps) make the chemical reaction in the glowstick happen faster. This increased motion causes the light to brighten and to last for a shorter amount of time.
- Slower moving molecules (cooler temps) make the chemical reaction in the glowstick slow down. This decreased motion causes the light to dim and to last for a longer amount of time.
Activity logistics
- Ages: As written, this activity is best-suited for students ages 9-12.
- Time: 30 minutes. A 10-minute video will be shown to provide the necessary background knowledge and invite students to conduct a related hands-on activity at home. E-mail the classroom teacher to make the necessary arrangements.
- Facilitators: One chemist and one teacher will manage the pausing and restarting of the video, the class discussions, and the distribution of the glowsticks and worksheet at the end of the presentation or at the end of the school day.
Prepare in advance
What you’ll need
- Access to the video, Slow the Glow
- Computer, projector, and screen
- Ability to pause and restart video
- Copy of one double-sided worksheet per student
- Two glowsticks per student
Notes about the materials
- This video can be shown online or downloaded. If internet access may be unreliable, download the video in advance.
- Make one double-sided copy of the Slow the Glow worksheet for each student. The worksheet contains instructions for setting up the experiment and safety information for at-home care-givers.
- Let the teacher know that you will give each student two glowsticks and one worksheet to experiment with at home. Teachers often have processes in place to simplify distribution.
Facilitate the activity
Invite Participation
1. Introduce yourself.
Tell the students your name and that you love science.
- You devoted your career to chemistry.
In one or two sentences describe what you did as a chemist. For example, “I worked at XYZ Company and helped develop protective coatings for glass optical fibers so they would stay strong for a long time.” - You became very interested in science or chemistry.
Tell students a brief story about when you first became interested in science. For example, “When I was in fourth grade, the teacher placed the cut end of a celery stalk in water colored with red food coloring. We watched as the red water crawled up the very thin tubes in the celery.” - You chose to study chemistry in school.
Elementary school students do not get to choose their classes, but as they advance through middle school, high school, and college they will have increasing levels of choice. Replace this text with one sentence about your choice to study chemistry.
2. Find out what the students already know about glowsticks and clarify what type of glowing or light-up device you will explore during your time with them.
“Today we are going to talk about the secret science inside glowsticks and what you can do to make the glow brighter and last longer. First, I would like to know what you already know about glowsticks.”
Hold up one glowstick, not yet activated, so that students are clear on the type of device they will learn more about with you.
“Raise your hand if you have ever used a glowstick. Sometimes these are shaped like a small stick, necklace, or wand that gives of light.”
Ask students:
- What was your glowstick like?
You may notice that some of the products students mention have small batteries in them and others do not. They may not be aware of the difference. If this comes up, tell them that both types work because of chemistry, however today you will focus the types of light-producing objects that do not contain batteries. - Could you turn the glowstick on and off?
Explain that the light-up toys with batteries have a switch so that they can be turned off and on. Students typically study electricity in fourth and fifth grades, so they may be familiar with switches and small LED bulbs. In an emergency situation when there might be a risk of fire, electricity could be dangerous.
“We will explore the type of glowsticks that light up when chemicals mix together, not by a switch. Glowsticks are safe to use in emergency situations because there is no electricity. They are even useful underwater!”
3. Give a broad overview of your lesson.
“When you activate a glowstick, you are doing chemistry! We will watch a video that shows two people investigating whether temperature affects the brightness of the light released from a glowstick. After the video, we will talk about an experiment you can do at home with two glowsticks that I will give to each of you.”
Support Exploration
4. Start the video to reveal what is inside a glowstick and then pause it to ask the question at 1:12-1:29. The student in the video holds a glowstick and describes what he sees inside it. The chemist explains that chemicals are intentionally kept separate so that the chemical reaction happens when we want it to light.
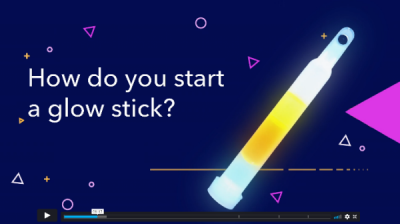
Ask students:
- How do you start a glowstick?
Students may say that you snap it, bend it, or shake it. It is ok if they do not associate this with breaking a glass container and mixing chemicals yet. All of the things they say are from their experience and are part of the answer. What actually happens inside a glowstick is shown and described as soon as you resume the video.
5. Resume the video and ask the question at 2:02-2:18. The chemist explains that sometimes chemists want to modify or change the chemical reaction. One way to do this is through temperature.
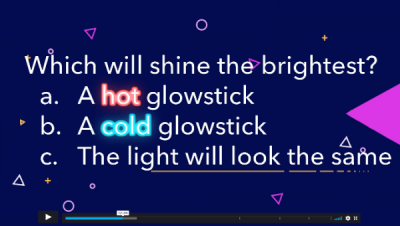
Ask students:
- Which will shine the brightest?
- A. A hot glowstick
- B. A cold glowstick
- C. The light will look the same
- Ask the teacher in advance how to get a quick vote to find out what students are thinking. For example, you may ask for a quick show of hands or the class may vote with thumbs up down or to the side as you read each option aloud. It is fine if students do not yet know the correct answer yet. Finding the answer is the point of the experiment.

6. Watch the experiment on video to find out which actually shines the brightest.
The chemist pours hot, cold, and room temperature water. The student bends all three glowsticks, which make an audible snapping sound as the glass ampule inside breaks. Both chemist and student shake the glowsticks and place them in the three cups of water. They compare the brightness of the light in the three cups and order them from least bright to the brightest.
Deepen Understanding
7. Pause the video between 5:28-5:44. Have a class discussion about making a hypothesis.
Ask students:
- What will happen if we switch the glowsticks in the cold and hot water?
After seeing what happened in the first portion of the activity, most students will say that the dim light will brighten in the hot water and the bright light will dim in the cold water. - You just made a hypothesis! What is a hypothesis?
Help students realize that a hypothesis is a prediction of what might happen in an experiment based on previous experience and existing knowledge.
Return attention to the video.
The student switches the glowsticks in the hot and cold water. While we wait for results, a molecular model animation reveals the difference in the speed of water molecules in cold, room temperature, and hot water. Once the student and chemist return to the experiment, the glowstick in hot water is now the brightest and the glowstick in cold water is now the dimmest. The chemist asks, “Is your hypothesis correct?” The student smiles because it is! Many of your students will feel validated as well.
8. Continue with the video which explains what is happening at the molecular level. This portion of the video explains the connection between the speed of the molecules and the brightness of the light observed by students during the on-screen experiment.

An animation introduces the idea that a chemical reaction occurs when molecules collide just right, atoms rearrange, energy is released, and the resulting new molecules move away from one another. Note that the animation does not represent actual compounds. It is simplified to serve as a learning tool for elementary students.
The video adds in the terms chemiluminesence and bioluminescence as bonus content. Students do not need to know these terms in elementary school. However, they may have experienced both in their lives. Introducing the terms serves as a way to bring feelings of relevance towards chemistry.
9. Make the connection between reaction rate and the time it takes for a chemical reaction to end. Students may have learned about similes and metaphors in their language arts classes. These comparisions are typically introduced in fourth, fifth, or sixth grade. The simile used in the video relates kids running toward a finish line to the time when the chemical reaction that makes glowsticks light up will come to an end.
Stop the video between 8:38 and 8:42.
Ask students:
- How do you know when the chemical reaction in a glowstick has finished?
"The light emitted from a glowstick only happens during the chemical reaction. When the reaction ends, the light stops. So, we can use the light to indicate when the chemical reaction is occurring. When the light goes out, the chemical reaction is over.
Advance the video slightly and stop again between 8:48 and 8:57. After students answer, restart the video to reinforce or correct their ideas.
Ask students:
- Which chemical reaction will finish first?
- A. The chemical reaction in a room temperature glowstick will finish first.
- B. The chemical reaction in a cold glowstick will finish first.
- C. The chemical reaction in both glowsticks will end at the same time.
- D. Both will glow on forever!
- Students will need to remember the differences in molecular motion in room temperature and cold water and apply the simile of kids running toward a finish line in order to answer this question correctly. Ask students to explain their in reasoning as they select one of the four options. The video provides the explanation to ensure that they are thinking of the relationship correctly.
Support Exploration
10. Conclude the video and end with a question for students to investigate at home. The question appears at the very end of the video after the credits, from 9:49-10:03. Whether or not you choose to stop on this slide, use the question as a prompt for your class discussion.
“What you’re going to do with your glowsticks is similar to what a chemist does.”

Ask students:
- Chemists begin with a scientific question. Which will glow the longest?
- A room temperature glowstick, or
- A cold glowstick.
- This question is very similar to what was asked before. However, it is flipped so that rather than focusing on which will finish first, this question is about which will last the longest.
Note: Heating a glowstick, beyond what was done in the video, is not safe. This question focuses on how people normally interact with a glowstick which they would like to keep glowing for as long as possible. - Chemists prepare a hypothesis. What is your hypothesis?
Review that a hypothesis is a prediction of what might happen in an experiment based on previous experience and knowledge. The video and student responses so far provide both so that students are able to make an informed hypothesis. Explain that it is ok if a hypothesis is proven wrong. Either way, new knowledge is created and understanding of the phenomenon is deepened. - Chemists design and conduct fair experiments to answer scientific questions. How would you set up an experiment to find out if your hypothesis is correct?
Once the hypothesis is in place, chemists design a fair test. In the video, the chemist and student placed one glowstick in hot water, another in cold water, and a third in room temperature water. The glowstick could have been left out to room temperature air, but there is a chance that soaking in water could make a difference in the chemical reaction. So the glowstick was placed in the same amount of water in the same kind of cup. The only difference was the temperature of the water.
Have students share their ideas for their own experiment to find out whether the light from a room temperature glowstick or a cold glowstick will last longer. Student ideas will vary! - Chemists use scientific evidence from their experiments to answer questions. What would you expect to happen if your hypothesis is correct?
- If the glow from a cold glowstick lasts longer, it will still be glowing after the room temp one stops glowing.
- If the glow from a room temp glowstick lasts longer, it will still be glowing after the cold one stops glowing
- Chemists apply their knowledge to new situations.
Conclude by telling students: “After doing this experiment and gathering evidence you will know what to do if you get a glowstick and want the glow to last as long as possible!”
11. With the help of the teacher, distribute one double-sided worksheet and two glowsticks per student.
The teacher may choose to distribute the take home items at the end of your presentation or at dismissal at the end of the school day, rather than during your visit. The worksheet include prompts to help students document their hypothesis, record their observations, and draw conclusions based on evidence. It also provides safety information about glowsticks.
You may choose to leave your contact information so that the teacher can update you on the students’ experimental findings as well as ask any questions that the students or their families have about the glowsticks.
Clean-up
Proper disposal
- Used glowsticks may be safely disposed of with the household trash.
- Do not cut the plastic tube of the glowstick at any time.
This classroom visit activity was developed for the Great Connections project, a collaboration between the Senior Chemists Committee and the Committee on Community Actitivites.