Lesson Overview for Teachers
View the video below to see what you and your students will do in this lesson.
Downloadables:
Lesson Plan (PDF) | Student Activity Sheet (PDF) | Teacher Background (PDF) | Connections to NGSS (PDF)
Objective
Students will be able to plan and carry out an investigation to discover and compare the properties of liquids. Students will develop an understanding that liquids, like solids, have their own characteristic properties.
Key Concepts
- Liquids have their own characteristic properties.
- Even if liquids look similar, they can have different properties.
- The properties of liquids can be discovered by doing tests on them.
- To compare the properties of liquids, the liquids need to be tested in the same way.
NGSS Alignment
- NGSS 2-PS1-1: Plan and conduct an investigation to describe and classify different kinds of materials by their observable properties.
Summary
Students have looked at the properties of solids and in this lesson, will see that liquids also have properties.
- Students investigate three clear colorless liquids: water, mineral oil, and corn syrup.
- Students place drops of each liquid on the surface of a zip-closing plastic bag and see that the liquids look and act differently.
- Students tilt the bag and see that the liquids move down the plastic at different rates.
- Finally, students see a demonstration in which a drop of food coloring is placed in each liquid and students make observations about the different way the food coloring looks in each.
Evaluation
Download the Student Activity Sheet (PDF) and distribute one per student when specified in the activity. The activity sheet will serve as the Evaluate component of the 5-E lesson plan.
Safety
Be sure students wear properly fitting goggles.
Materials
- Water
- Mineral oil
- Corn syrup (Clear colorless Karo syrup works well)
- 3 small plastic cups for each group
- 3 disposable droppers for each group
- 1 Quart-size plastic bag
- Cardstock
- Paper towels
Teacher preparation:
- Use a permanent marker to label 3 small plastic cups for each group: Water, Mineral Oil, and Corn syrup. Place about 1 teaspoon of liquid in each labeled cup
- Label one extra set of cups for you to use in the Engage and the Extend part of the lesson. In your cups, fill each about halfway with the labeled liquid.
- Cut cardstock so that it fits inside a zip closing plastic bag. Label sections of the cardstock Water, Oil, and Syrup as shown. Put the piece of cardstock inside the plastic bag and seal the bag. Make one for each student group.
- Distribute the cups of liquid, three droppers and the plastic bag with the labeled cardstock to each group.
Materials for each group
- Cup with water
- Cup with mineral oil
- Cup with corn syrup
- 3 disposable droppers
- Plastic bag with cardstock in it
- Paper towel
ENGAGE
1. Show students samples of water, mineral oil, and corn syrup and tell students that they will investigate the similarities and differences between them.
Explain to students that so far they have looked at the properties of lots of different objects and materials, but they have all been solids.
Ask students:
- Do you think liquids have properties too?
Have students brainstorm possible properties of liquids. They might come up with colorless or colored, thickness (viscosity), smell (odor), etc.
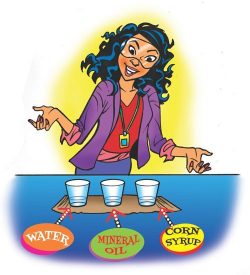
Show students a sample of water, mineral oil, and corn syrup in three separate clear plastic cups.
Note: Save these liquids because you will use them in a demonstration in the EXTEND part of the lesson.
Tell students that even though the liquids look the same, they may have different properties or characteristics. Explain to students that scientists make discoveries by observing and testing different substances. Tell students that they can be scientists by observing and testing the liquids to try to discover their properties.
Note:
- Mineral oil and corn syrup have the potential to be very messy if spilled. You could place the cups in trays, or have students be sure to have the cups in the middle of the desk or table.
- Be sure to use disposable droppers since the mineral oil and corn syrup left in the droppers will be difficult to clean out. Also, depending on the dropper, it might be a bit challenging to get the corn syrup into the dropper and to dispense exactly 3 drops. If this happens, students could use a small plastic spoon or popsicle stick to put a small amount of corn syrup that looks like about 3 drops on the plastic bag.
- It is likely that using the droppers will intrigue your students. If you have time earlier in the day or at the beginning of the lesson, you might want your students to have a chance to try out using the droppers with some water before the actual experiment. That way the novelty of using the droppers will be reduced and students can focus more on the science and less on playing with the droppers.
Give each student an Activity Sheet (PDF).
Students will record their observations and answer questions about the activity on the activity sheet.
EXPLORE
2. Have students test the water, mineral oil, and corn syrup.
Question to investigate: Do liquids that look similar have different properties?
Materials for each group
- Cup with water
- Cup with mineral oil
- Cup with corn syrup
- 3 disposable droppers
- Plastic bag with cardstock in it
- Paper towel

Procedure
- Lay the bag flat on the desktop or tabletop.
- Use droppers to place three drops of each liquid together on the plastic bag under the label for that liquid.
Ask students:
- What do you notice about the way each liquid looks on the plastic?
The water looks very round.
The oil is much flatter and seems to spread out more.
The syrup looks similar to the water but maybe is a little flatter.

Demonstrate how students should tilt their bag.
First model how students should slowly lift and tilt the bag by using two hands to hold the top corners of the bag. When demonstrating, use a bag with a card inside but without liquids on the bag.
- Hold onto the top corners of the bag and slowly lift and tilt the bag to see how the liquids move down the plastic.
Ask students:
- What do you notice about the way each liquid moved down the plastic?
The water went really fast and beat the other liquids. It stayed together all the way down.
The oil was slower but still made it to the bottom. It created a long streak.
The syrup barely moved and then moved very slowly when the plastic was tilted more. It moved a bit faster when the plastic was held straight up and down.
EXPLAIN
3. Show an animation and explain that since water, oil, and corn syrup are made from different molecules, they act differently.
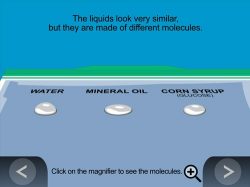
Show the Animation Liquids Have Properties.
Note: This animation uses models of molecules to help explain why the liquids act differently. It is meant to give students exposure to the term “molecule” and to the idea that the substances around them are made up of tiny little things they cannot see. Students are also introduced to the idea that different molecules give substances their different characteristics.
Explain to students that two things affect how fast the liquids move - 1: The amount that the liquid sticks to the plastic, and 2: The way the molecules of the liquids interact with each other. (The stickiness is not shown in the animation)
The water molecules hardly stick to the plastic at all. They are also very small and can move past each other easily. The oil molecules stick to the plastic a little. They are also long and can get tangled with each other and cannot move past one another as easily as water molecules can. The glucose molecules stick to the plastic the most. They are also very large and shaped in a way that makes it difficult for them to move past one another.
EXTEND
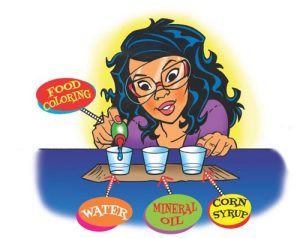
4. Do a demonstration by putting food coloring in each liquid and having students make observations.
Materials for the demonstration
- 3 small clear plastic cups
- Water
- Mineral oil
- Corn syrup
- Food coloring
Teacher preparation
- Add enough liquid so that each cup so they are all about ½ - full.
- Use a permanent marker to label three pieces of masking tape or paper Water, Oil, and Syrup.
- Place these on a front table or desk where you will do the demonstration.
- Put the cups of water, oil, and syrup at their labeled area.
Have students come to the front of the class so they can see the three liquids up close.
Explain to students that another test can be used to investigate the different properties of the liquids.
Tell students that you will add 1 drop of food coloring to each liquid to see if there is a difference between the way the food coloring acts in the different liquids. Tell students to watch closely to see what the food coloring does.
Procedure
- Hold the food coloring container at the surface of the water and carefully add one drop.
- Repeat step 1 for the oil and the corn syrup.
Expected results
In the water, the food coloring sinks to the bottom and spreads out.
In the oil, the food coloring sinks to the bottom but stays together.
In the corn syrup, the food coloring stays on the top and spreads out.
Ask students:
- What did you see the food coloring do when it was added to the water, oil, and corn syrup?
The food coloring went to the bottom of the water and spread out. In the oil, the food coloring went directly to the bottom and did not spread out. In the syrup, the food coloring stayed on the top and spread out.
Ask students:
- The food coloring acted differently in each liquid. Does that tell you that the liquids are the same or different? Why?
Different. Since we put the same food coloring in all three liquids and they all looked and acted differently, there must be something different about the liquids to make this happen.


;void(0);)