;void(0);)
We use batteries to power toys, phones, remote controls, and more! Batteries provide the electricity these devices need to work. How do batteries get this electricity? Find out by building a battery out of roofing nails and liquids. These items will become the key parts of any battery— two electrodes and an electrolyte.
Question to Investigate
Which is the better electrolyte for a make-it-yourself battery, Gatorade® or distilled water?
Materials
- 5 copper roofing nails, 1¼ or 1½ inch nails, (30-40 mm)
- 5 zinc-coated roofing nails, 1¼ or 1½ inch nails, (30-40 mm)
- 5 small paper cups, 3-ounce or 90 mL size
- 6 wires with alligator clips on both ends
- Gatorade, any color/flavor, about 1 cup or 240 mL
- Distilled or deionized water, about 1 cup of 240 mL
- Tablespoon measure
- Small light emitting diode (LED), 5 mm bulb, any color (2.0V - 2.8V)
- Small buzzer, 1.5V or 3V or motor with a small propellor
- Large container or sink to collect used liquids
Note:
- If you would like to test different drinks, those that taste sour and/or say that they contain electrolytes tend to work best.
Procedure
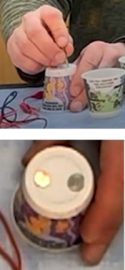
- Turn one paper cup upside down. Then carefully poke one copper nail and one zinc nail through the bottom of the cup, leaving a space between the nail heads, as shown.
- In the same way, place one copper and one zinc nail in each of the remaining cups.
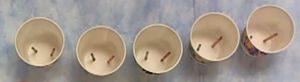
- Turn all 5 cups over and arrange them in a row so that there is a repeating pattern of copper and zinc spikes.
- The spikes are called electrodes.
- Each cup is one cell of the battery.
- Use a pencil or pen to write a small “+” on the inside of each cup above its copper nail. Write a small “-” above the zinc nail in each of the 5 cups.
- The copper nail is the positive (+) electrode, called the cathode.
- The zinc nail is the negative (-) electrode, called the anode.
Connect the electrodes
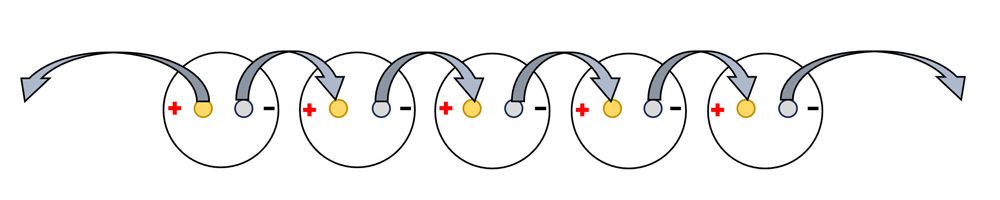
- Attach one alligator clip to the copper cathode at the very end of the row of cups. Leave the alligator clip on the other end of this wire unattached to anything, for now.
- Using a different wire, attach one alligator clip the zinc nail of the same cup. Attach the other end of this alligator clip to the copper nail in the cup next to it.
- Follow this method until all the nails are connected as shown in the diagram below.
- Test your battery by connecting each of the two unattached alligator clips to one of the legs of an LED bulb or to the metal tabs on a small buzzer.
- Connect the copper cathode to the longer leg on the small LED or the metal tab marked with a plus sign.
- Connect the zinc anode to the shorter leg on the small LED or the metal tab marked with a plus sign.
- Does the bulb light up? OR Does the buzzer make a sound? OR Does the propellor spin?
Not yet! Your battery needs an electrolyte.
- Disconnect the bulb, buzzer, or motor from the copper cathode and zinc anode.
Is Gatorade a good electrolyte?
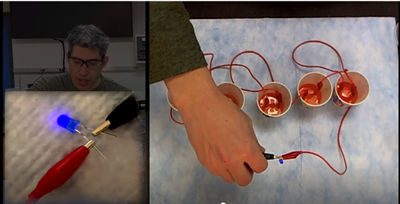
- Carefully pour 2 tablespoons (30 mL) of Gatorade (or other drink) into all five cells (paper cups). Make sure that the alligator clips remain above the surface of the liquid.
- Test the drink (and your battery) by connecting the copper cathode and zinc anode to the legs of the LED or the metal tabs of the buzzer or motor as you did in Step 7.
- Does the bulb light up? OR Does the buzzer make a sound? OR Does the propellor spin?
- Notice the brightness of the bulb, the loudness of the buzzer, or the speed of the motor.
- When you are finished, disconnect the bulb or buzzer from the copper cathode and zinc anode of your battery. Keep your electrodes connected!
Prepare your battery for the next liquid
- Carefully pour the liquid from each cup into a large container or sink.
- Rinse each cup by adding a little water, swirling, and pouring the liquid out.
Is distilled water a good electrolyte?
- Carefully pour 2 tablespoons (30 mL) of distilled water into each of the five cells (paper cups) of your battery. Remember that the alligator clips must be above the surface of the liquid.
- Test the water by connecting the copper cathode and zinc anode to the legs of the LED or the metal tabs of the buzzer or motor as you did in Steps 7 and 10.
- Does the bulb light up? OR Does the buzzer make a sound? OR Does the propellor spin?
- Notice the brightness of the bulb, the loudness of the buzzer, or the speed of the motor.
How does it work?
All batteries contain key parts that make them work—two electrodes and an electrolyte. The electrodes cannot be made of the same metal. They must be made of one metal that gives up electrons easily and another metal that accepts electrons easily.
Zinc gives up electrons. This type of chemical reaction is called oxidation and this process is why the zinc end of your battery has a negative charge. The electrode that gives up electrons is called the anode.
At the copper electrode, protons from the acids or salts in the drink accept the electrons and react to form hydrogen gas. This type of chemical reaction is called reduction and this process gives the copper end of your battery a positive charge. This makes the copper electrode the cathode.
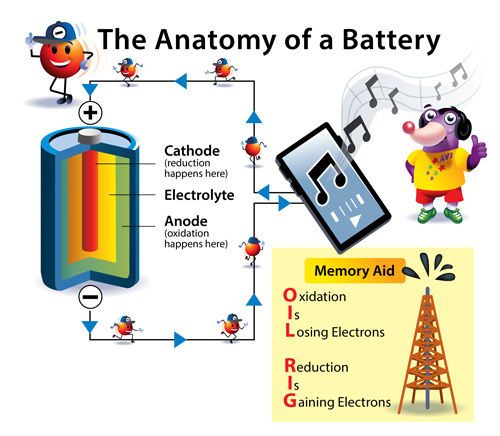
If you look closely at a battery that powers a toy, flashlight, or remote, you will likely see a small “+” sign written near one end. This tells you where the cathode is. The anode is at the other end of the battery as well as all along the round inside wall of the battery. The cathode and anode can never touch.
In your make-it-yourself battery, you tried two different liquids to see which one was the better electrolyte. The bulb didn’t light up with distilled water because dissolved minerals or salts, which are usually in water you get from a faucet are intentionally removed from it. Distilled water is not an electrolyte at all.
However, the bulb lit brightly when you used Gatorade, or a similar drink containing “electrolytes.” While the salts in these drinks are meant to restore electrolytes that your body loses when you exercise and sweat, they also work well enough to make a low-voltage battery.
Good electrolytes do two things. One is that they block electricity from flowing between the cathode and anode. This forces the extra electrons at the anode to move through your device to get to the cathode. The second thing that good electrolytes do is help the chemical reactions happen at the anode and cathode. If you’d like to test other liquids in your battery, try substances that contain salts, like table salt or Epsom salt, or drinks that say that they contain electrolytes. You may also try acidic substances, such as lemon juice or vinegar. Gatorade contains citric acid for a pleasant sour taste and salts. This combination makes it, and other sports drinks good electrolytes for a make-it-yourself battery.
References:
- CCEW 2024 Theme Team Members:
- Dr. Veronica Jaramillo, Dean of the Department of Natural Sciences and Chemistry Professor at Pasadena City College
- Dr. Neal Abrams, Chemistry Professor at SUNY Environmental Science and Forestry
- This activity is based on the hands-on activity, Two-Cell Battery, from Teach Engineering.