Lesson Overview for Teachers
View the video below to see what you and your students will do in this lesson.
Objective
Students will be able to develop and explain a particle-level model to describe their observations of water dissolving salt, the water evaporating, and the salt crystals re-forming.
Key Concepts
- Dissolving a solid in a liquid depends on the interactions and attractions between the molecules of the liquid (solvent) and the particles of the solid (solute).
- Dissolving happens when the attraction between the particles of the solvent and solute are strong enough to overcome the attraction of the particles of the solute for one another.
- Evaporation happens when water molecules move fast enough to break away from a solution and move into the air.
- When a solution evaporates, the water goes into the air but the solid is left behind.
NGSS Alignment
- NGSS 5-PS1-1: Develop a model to describe that matter is made of particles too small to be seen.
Summary
- Students continue exploring the particle nature of matter by first dissolving salt in water, then allowing the water to evaporate, and finally observing the solid salt left behind.
- After viewing a model of salt, students help develop models for the processes of salt dissolving, water evaporating to form a gas, and salt re-forming as a crystal.
- The focus is that matter, whether solid, liquid, or gas, is made up of particles; that dissolving and evaporation happen at the particle level; and that models can help explain these processes that we cannot see.
Evaluation
Download the student activity sheet and distribute one per student when specified in the activity. The activity sheet will serve as the Evaluate component of the 5-E lesson plan.
Safety
Make sure you and your students wear properly fitting safety glasses or goggles.
Clean-up and Disposal
Remind students to wash their hands after completing the activity.
All common household or classroom materials can be saved or disposed of in the usual manner.
Materials for each group
- Kosher salt (Kosher salt does not contain additives and tends to form a clearer solution when dissolved)
- Teaspoon
- Water
- Clear plastic cup
- Petri dish or other shallow container (such as the lid from a yogurt container)
Engage
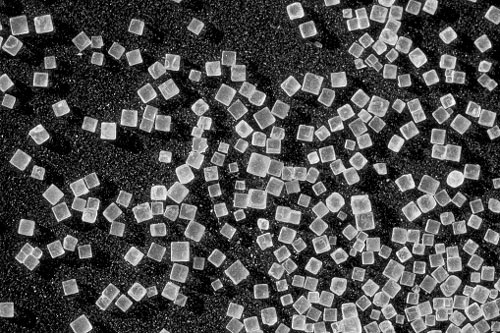
1. As a demonstration, show students a magnified picture of salt crystals.
Remind students that they have seen the particles of a liquid and solid interact when water dissolved the sugar from an M&M (Lesson 1.2). Explain that in this activity, students will investigate how water dissolves salt crystals. They will also explore how the water from the salt solution evaporates, and how the dissolved salt forms back into crystals again.

Show the photo: Magnified salt (JPG).
Explain that this is a magnified picture of salt crystals. Tell students that each salt crystal is made up of two different types of particles called sodium ions and chloride ions. Tell students that ions are atoms or molecules that have either a positive or negative charge.
2. Show students a model of a salt crystal on the molecular level.
Explain that one way to make a model of a salt crystal is to use circles or spheres to represent the sodium and chloride ions.

Show the illustration: Sodium chloride model (JPG).
Explain that the spheres represent sodium and chloride ions and that sodium ions (white) have a positive charge and chloride ions (green) have a negative charge. Since positive and negative charges attract, the sodium and chloride ions stay together as a crystal. A single salt crystal contains thousands of trillions of each kind of ion.
Give each student an Activity Sheet (PDF).
Students will record their observations and answer questions about the activity on the activity sheet.
Explore
3. Have students dissolve the salt.
Question to investigate: What happens when salt is dissolved in water and then the water evaporates?
Explain to students that they will dissolve salt and then develop a model to describe what is happening on the molecular level.
Materials for each group
- Kosher salt
- Graduated cylinder or teaspoon
- Water
- Clear plastic cup (8-oz)
- Petri dish or other shallow container, such as the lid from a yogurt container
Procedure
- Place 1 teaspoon of salt into a clear plastic cup.
- Add about 20 milliliters (4 teaspoons) of water to the cup with the salt and swirl until most or all the salt dissolves.
- Pour the salt water into a shallow container like a petri dish or yogurt container lid and set aside for 24 hours.
Ask students:
- If water molecules have areas of positive and negative charge, and the sodium and chloride are positive and negative ions, how do you think the water dissolves the salt?
The positive and negative areas of the water attract the oppositely charged ions in the salt and pull them apart.
Explain
4. Show an animation to help explain how water molecules dissolve salt.
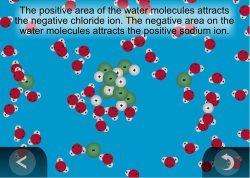
Show the animation: Water Dissolving Salt.
Explain to students that water molecules attract the sodium ions (positive) and chloride ions (negative) and pull them away from the salt crystal. The water molecules surround the ions, which become dissolved in the water.
5. Have students draw a model of water dissolving salt on the molecular level.
On the Activity Sheet, have students describe what happens during the dissolving process when water dissolves salt. Students should state that the sodium ions are positively charged, and the chloride ions are negatively charged. They should also note that water molecules have areas of both positive and negative charge, which attract the ions and cause the salt to dissolve in the water.
Ask students:
- What do you think will happen to the water overnight?
Some or all of it will evaporate. - What do you think will happen to the salt in the water?
Students may think that the salt will also evaporate, or that the salt will be left behind when the water evaporates.
Overnight, most of the water will evaporate, and solid salt crystals will begin to form in the bottom of the container.
Next Day
6. Have students observe and describe what they see in their shallow containers.
Ask students:
- What do you observe about the salt solution you left out overnight?
Small square salt crystals are visible on the bottom of the container. - What do you think happened to make the dissolved salt form into crystals again?
The water evaporated and the sodium and chloride ions joined together again to make salt crystals.
7. Show an animation to help explain how salt recrystallizes as water evaporates.
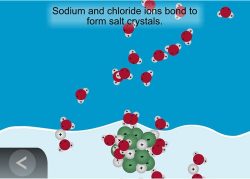
Show the animation: Evaporating Salt Water.
Explain that as the water evaporates, water molecules go into the air. The water molecules that evaporate become a gas called water vapor. Only the water evaporates, leaving the sodium and chloride ions behind. The sodium and chloride ions attract each other and re-form salt crystals.
Extend
8. Explain another change of state – liquid water to solid ice.
Remind students that evaporation is a change in state from a liquid to a gas. Tell students that evaporation happens faster when water is heated. You could ask for some examples, such as a towel or a puddle drying in the sun.
Ask students:
- What is the change of state that happens when water gets cold enough?
It changes from water (liquid) to ice (solid).
Explain that another change in state is when liquid water cools enough and freezes to form ice. Instead of changing from a liquid to a gas, like in evaporation, the water molecules change from the liquid state to a solid when water freezes.
Tell students that one of the unique things about water is that water molecules are farther apart in solid ice than they are in liquid water. That is why ice takes up more space than the water that was frozen to make it. It is also why ice is less dense than water and floats.
9. Show an animation to help explain why ice takes up more room than liquid water.
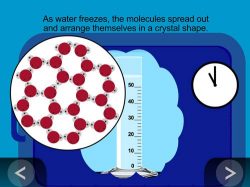
Show the animation Liquid Water to Solid Ice.
Explain that in liquid water, the water molecules are attracted to each other so they are close together but can move past one another. As they cool to the freezing temperature of water, the molecules slow down, spread out, and arrange themselves to become the crystal structure of ice.


;void(0);)