Lesson Overview for Teachers
View the video below to see what you and your students will do in this lesson.
Objective
Students will be able to plan and carry out an investigation to identify a liquid based on how it interacts with water. Students will also be able to explain, on a molecular level, why different liquids act differently when mixed with water.
Key Concepts
- The way a liquid mixes with water is a characteristic property of the liquid and can be used to identify the liquid.
- For a “mixing test” to be fair, the same amount of each liquid should be mixed in the same way.
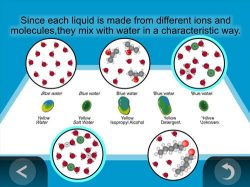
- The different atoms and molecules that make up a liquid cause it to mix with water in a characteristic way.
NGSS Alignment
- NGSS 5-PS1-3: Make observations and measurements to identify materials based on their properties.
- NGSS 5-PS1-1: Develop a model to describe that matter is made of particles too small to be seen.
Summary
- Students will test the same liquids as in Lesson 2.2 - water, salt water, alcohol, and detergent solution. But in this activity, all the liquids tested are colored yellow.
- Students will mix these liquids with water that has been colored blue to see if the liquids have a characteristic way of mixing with water.
- Students will use their results to identify an unknown liquid that is the same as one of the known yellow liquids. The unknown in this lesson is salt water.
Evaluation
Download the student activity sheet and distribute one per student when specified in the activity. The activity sheet will serve as the Evaluate component of the 5-E lesson plan.
Safety
Make sure you and your students wear properly fitting safety goggles. Isopropyl alcohol is flammable. Keep it away from heat, sparks, open flames, and hot surfaces. Isopropyl alcohol is also irritating to eyes and skin, and may cause drowsiness or dizziness if inhaled. Work with isopropyl alcohol in a well-ventilated room. Read and follow all warnings on the label.
Clean-up and Disposal
Remind students to wash their hands after completing the activity. Isopropyl alcohol should be disposed of according to local regulations. All other common household or classroom materials can be saved or disposed of in the usual manner.
Materials for Teacher Preparation
- Water
- Isopropyl “rubbing” alcohol (70%)
- Clear colorless detergent
- Salt
- Yellow food coloring
- Blue food coloring
- 5 Droppers (4 labeled droppers from the previous activities + 1 additional)
- 5 Small cups (4 labeled cups from the previous activities + 1 additional)
Teacher preparation:
Reuse labeled cups and droppers from Lesson 2.2
If you have liquids left from Lesson 2.2, you can use them. If not, use the steps below to make new liquids.
Use a permanent marker to label five small cups Water, Salt Water, Alcohol, Detergent, and Unknown.
Make solutions for the class according to the following procedure. These instructions make 1/4 cup of each solution, which is enough for eight groups to conduct the activity.
- Water—Use 1/4 cup regular tap water.
- Isopropyl alcohol (70%)—Use 1/4 cup 70% isopropyl alcohol, also known as “rubbing” alcohol. Do not use a higher percent isopropyl alcohol, such as 91% or 100%.
- Salt water—Add 2 tablespoons salt to 1/2 cup tap water. (The extra salt water is for the unknown.)
- Detergent solution—Add 1 teaspoon of liquid hand soap or detergent to 1/4 cup water. Stir gently until well-mixed.
- Unknown - Salt water
Only the teacher will need yellow and blue food coloring when preparing the solutions.
To prevent spills, you could tape cups to the desks or tables so that the cups and droppers do not fall over.
Coloring the Liquids
- Add 2 drops of yellow food coloring to each liquid described above.
- Place about 1 teaspoon of each yellow solution into its labeled cup. Use salt water for the unknown.
- Add 4 drops of blue food coloring to 1/2 cup of tap water.
- Label one small cup water for each group.
- Place about 2 teaspoons of the blue water into the newly labeled water cups.
- Label one dropper W for the blue water.
Testing Sheet
Download and make copies of the testing sheet (PDF). Laminate each testing sheet. If you do not have access to a laminating machine, place each chart in a sandwich-sized zip-closing plastic bag, seal it, and have student groups tape each bag to the desk or table. These testing sheets can be reused.
Engage
1. Tell students that they will identify an unknown liquid based on how the liquids mix with water.
Explain to students that in the previous lesson, they were able to identify an unknown liquid by comparing how certain liquids acted on wax paper and construction paper. Tell them that they will now use the same liquids but will try to identify an unknown liquid based on how the liquids mix with water.
Explain that the unknown liquid is the same as one of the labeled liquids. Be sure students understand that to identify the unknown they will compare the way the blue water mixes with the unknown to the way the blue water mixes with each of the four known liquids.
Give each student an Activity Sheet (PDF).
Each student group should also receive a laminated testing sheet. Students will record their observations and answer questions about the activity on the activity sheet.
Explore
2. Describe the testing procedure and have students combine a small amount of each of the yellow liquids with blue water.
Question to investigate: Can you identify an unknown liquid based on how liquids interact with and mix with water?
As you explain the testing procedure for this activity, discuss with students the importance of using each dropper for only one liquid, so that liquids do not accidentally mix in the cups. Students should also use a clean toothpick to combine each pair of liquids. Point out that the test will be most fair if the students “pull” the blue water to the yellow liquid each time.
Students should use yellow, blue, and green pencils to record their observations on the activity sheet as they combine each pair of liquids. Students should also write a descriptive caption for each drawing that gives information not shown in their drawings. A sample description might be, “the ends stayed yellow and blue for a while with a green area in the middle and eventually all turned green.”
Be sure to let students know that their drawings and written observations should be detailed because they will need this information to identify the unknown liquid.
Materials for each group
- Water in cup (blue)
- Water in cup (yellow)
- Isopropyl alcohol (70%) in cup (yellow)
- Detergent solution in cup (yellow)
- Salt water in cup (yellow)
- Unknown liquid (salt water) (yellow)
- 5 Droppers (4 labeled droppers from the previous activities + 1 additional)
- 5 Small cups (4 labeled cups from the previous activities + 1 additional)
- Crayons or colored pencils
- Toothpicks
- Paper towels
Procedure
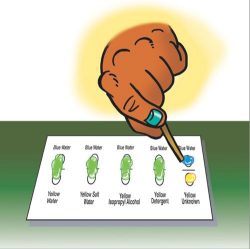
Note: Demonstrate how to hold the toothpick horizontally to “pull” one large drop of blue water toward one of the yellow drops. You may want students to come to the front of the class as you demonstrate this.
Once groups are working, check to see that they add enough liquid to completely fill each circle on the chart. Also be sure that students use the toothpick only to move the blue drop of water toward the yellow drop. They should not use the toothpick to stir the liquids.
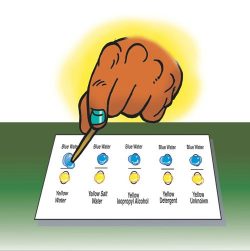
- Add several drops of each yellow liquid, as well as the blue water to the labeled circles on the chart to completely fill each circle. Depending on the size of the droppers, you may need to add about 5 drops or more.
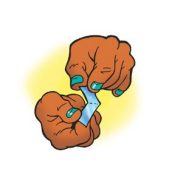
- Use a toothpick to pull the blue water toward the yellow water. It may take a few tries to get the liquids to join. As soon as the two drops meet, lift the toothpick away and discard it. Do not stir. Watch the two drops combine on their own.
- Use colored pencils to draw what the combined yellow and blue liquids look like as they interact and mix. Also, write a description of your observations.
- When the drawings and captions are complete for the first pair of liquids, combine the second pair, make a drawing, and record your observations. Continue testing the remaining known liquids in this way.
3. Have students discuss their observations.
Ask students:
- What happened as each pair of liquids combined?
Expected results:
- Water + Water: Colors do not combine completely. A region turns green in the middle, while the ends of the merged liquids remain the original yellow and blue colors.
- Water + Salt Water: Colors combine almost immediately as evidenced by the quick change to green throughout.
- Water + Alcohol: The yellow and blue liquids appear to “shake” for a time as they combine. Green color forms where they meet and shake and moves outward from this area.
- Water + Detergent: Colors combine at a medium rate and result in a more spread-out area of light green.
Identifying the unknown liquid
4. Have groups test and identify the unknown liquid.
Procedure
- To figure out the identity of the unknown, combine it with blue water the same way you combined the other liquids with water.
- Use your drawings and written observations if you need to. What do you think is the identity of the unknown?
5. Have students compare their results and draw conclusions.
Have students discuss their results and say what they believe is the identity of the unknown liquid. Ask students what evidence they used to help them decide the identity of the liquid.
Reveal the identity of the unknown liquid: Salt water
Explain
6. Show an animation to help explain why the liquids mixed with water differently.
Show the animation Identifying Unknown Liquids by How They Mix.
Since water, salt water, alcohol, and detergent are all made from different atoms and molecules, with different sizes, shapes, and positive and negative charges, each liquid interacts with water in a unique or characteristic way.
Extend
7. Show students an unexpected interaction of isopropyl (rubbing) alcohol and water.
Students may have noticed the movement where the rubbing alcohol and water touched. The interaction between alcohol and water has some unexpected properties. Students can try a fun activity to further investigate this interaction.
Teacher Preparation
Cut aluminum foil into small strips about 2 cm long and about 1 cm wide. Label 1 cup Rubbing Alcohol for each group and place 1 teaspoon of the alcohol in each cup.
Materials for each group
- Disposable plastic plate
- Water
- Isopropyl “rubbing” alcohol (70%) in cup
- Cotton swab
- Aluminum foil (about 2 cm long x 1 cm wide)
Procedure
- Fill a plastic plate with water.
- Take the piece of aluminum foil and fold it so it is like an “L”. This is your “boat”.
- Place the aluminum foil on the surface of the water so it floats.
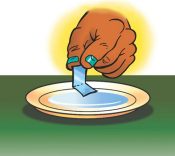
- Dip one end of the cotton swab in the alcohol. Bring the dipped end very close to the water, near the aluminum foil boat, but do not touch the water. Observe the boat to see if it moves.
Expected results
If you get very close to the water and the boat, the boat should move away from the cotton swab.
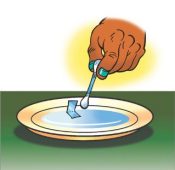
- Very lightly touch the water near the boat and see if the boat moves.
Expected results
The boat will suddenly move quickly away from the cotton swab.
- Pick up your boat and very gently lower it into the cup so that just the bottom of the boat touches the alcohol and then lift it up.
- Place the boat back on the surface of the water in the center of the plate.
Expected results
The boat will suddenly start moving around quickly in circles and in random directions.
Note: The explanation for this movement is not clear. In each test with the boat, isopropyl alcohol molecules are interacting with water molecules on the surface of the water. This may disturb or break the water’s surface tension and/or cause the alcohol molecules to spread out on the water’s surface resulting in the movement of the boat.


;void(0);)