Lesson Overview for Teachers
View the video below to see what you and your students will do in this lesson.
Objective
Students will be able to explain that the density of a substance has to do with how heavy it is compared to the size of the object. Students will also be able to explain that density is a characteristic property of a substance.
Key Concepts
- Density is a measure of how heavy something is compared to its size.
- If an object is more dense than water it will sink when placed in water, and if it is less dense than water it will float.
- Density is a characteristic property of a substance and doesn’t depend on the amount of substance.
Note: We are purposely using the terms “size” and “amount” instead of “volume” in discussions of density. We are also using “heavy”, “light”, and “weight” instead of “mass”. If your students have already learned the meaning of volume and mass, you can easily use those terms to define density as Density = mass/volume and then use those terms in the lesson.
NGSS Alignment
- NGSS 5-PS1-3: Make observations and measurements to identify materials based on their properties.
Note: The NGSS Structure and Properties of Matter for 5th grade, Performance Expectation 5-PS1-3 states “density is not intended as an identifiable property. Assessment does not include density or distinguishing mass and weight.”
Although the standard does not call for density to be used as a characteristic property to identify a substance, a basic introduction to density is included here as an optional element of a learning progression leading up to a middle school understanding of density.
Summary
- Students are introduced to the concept of density and that density has to do with how heavy something is relative to its size.
- Students are also introduced to the idea that whether a substance sinks or floats in water is a characteristic property of that substance and does not depend on the amount of the substance.
- Students also learn that if an object is more dense than water it will sink when placed in water, and if it is less dense than water it will float.
Evaluation
Download the student activity sheet and distribute one per student when specified in the activity. The activity sheet will serve as the Evaluate component of the 5-E lesson plan.
Safety
Make sure you and your students wear properly fitting safety glasses or goggles.
Clean-up and Disposal
Remind students to wash their hands after completing the activity.
All common household or classroom materials can be saved or disposed of in the usual manner.
Materials
- Clay (1 ball for each group)
- Clear plastic container of water
- Popsicle sticks (20)
- Rubber band

Engage
1. As a demonstration, place a clay ball in water to show that clay sinks.
Materials for the demonstration:
- Ball of clay
- Clear plastic container of water
Procedure
- Hold up a ball of clay about the size of a ping pong ball and ask students if they think it will sink or float in water.
- Place the clay in the water.
Expected result
The clay ball will sink.

Ask students:
- Do you think that if I use ½-the amount of clay that it will float or sink in water?
- Pinch off about ½ the clay, form it into a ball, and then put it in the water.
Expected result
It will sink.
Give each student an Activity Sheet (PDF).
Students will record their observations, and answer questions about the activity on the activity sheet.
Explore
2. Have students put smaller and smaller pieces of clay in water.
Question to investigate: Does changing the amount of material in an object change the object’s density?
Materials for each group
- Clear plastic container of water
- Clay ball (about the size of a marble)

Procedure
- Place your ball of clay in the water to see if it floats of sinks.
- Break off about ½ of the original clay ball, form it into a ball, and place it in the water. Does it float or sink?
- Break off another ½ of this smaller ball, form it into a ball and test to see whether it sinks or floats.
- Repeat this process two more times to make smaller and smaller clay balls. Test each one to see if it sinks or floats.
Ask students:
- Do you think clay is more dense than water or less dense than water?
More dense
Note: If students try a very tiny piece of clay, it may stay on the surface of the water due to the water’s surface tension. If students dip the tiny piece of clay in the water beforehand and then put it back on the surface of the water, it should sink.
3. Demonstrate that wood is less dense than water.
Materials for the demonstration
- Popsicle sticks (20)
- Rubber band
- Clear plastic container
- Water
Procedure
- Place 1 popsicle stick in the water to see if it sinks or floats.
Ask students:
- Do you think wood is more dense than water or less dense than water?
Less dense - What do you think will happen if we tie 20 popsicle sticks together – will the bundle of sticks sink or float?
Float


Explain
4. Use an animation to explain some basics about density.
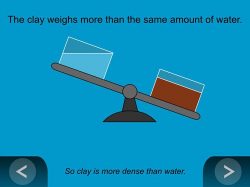
Show the Animation – Density: Clay and Water
Explain that density has to do with how heavy something is compared to its size. To compare the density of two substances like clay and water, you can compare the weight of the same “size” or volume, of each substance.
As you show the animation, explain that since a piece of clay weighs more than the same amount, or volume, of water, clay is more dense than water. Since clay is more dense than water, a ball of clay sinks in water, no matter how big or small the ball of clay is.
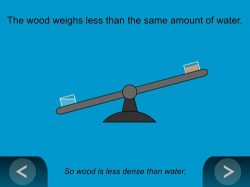
Show the Animation – Density: Wood and Water
If you compared the weight of wood and an equal amount, or volume, of water the sample of wood would weigh less than the sample of water. This means that wood is less dense than water. Since wood is less dense than water, wood floats in water, no matter how big or small the piece of wood is.
Extend
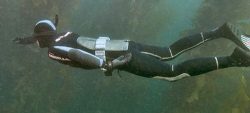
5. Show photos to explain how the density of an object can be changed.
The key to floating is being light for your size. So if you can add size to an object without adding much weight, the object will be lighter relative to its size. This means that the density of the overall object will decrease and be more likely to float.
Ask students to describe how this principle can be used to explain how a lifejacket can help someone float in water.
The key to sinking is being heavy for your size. If you can add weight to an object without adding much size, the object will be heavier relative to its size. This means that the density of the overall object will increase and be more likely to sink.
Ask students to explain how this principle can be used to explain how a weight belt can help a SCUBA diver sink in water when they might otherwise float.

Note: A student might want to know why a boat made out of steel can float when steel is more dense than water. This is not an easy question and requires a different approach than what students have seen so far. We do not necessarily recommend the following explanation for 5th graders but here is the idea:
An object floats when it displaces a volume of water that has a mass equal to the mass of the object. So if a material like steel is shaped into a boat and made larger and larger, it will displace more and more water. When it is large enough to displace a volume of water that has a mass equal to the mass of the boat, the boat will float.


;void(0);)