Lesson Overview for Teachers
View the video below to see what you and your students will do in this lesson.
Downloadables:
Lesson Plan (PDF) | Teacher Background (PDF) | Connections to NGSS (PDF)
Objective
Students will be able to explain that wearing a coat helps keep you warm because it blocks your body’s heat from moving away from you to where it’s cold.
Key Concepts
- The coat isn’t actually warm – it’s your body that’s warm.
- The coat keeps your body’s heat from moving away from you to where the temperature is colder.
- A thick coat is better than a thin light jacket at keeping your body’s heat close to you.
NGSS Alignment
- K-ESS2-1: Use and share observations of local weather conditions to describe patterns over time.
The activities focus on how wearing a coat helps keep us warm in cold weather.
Summary
- Discuss whether a thick or thin jacket helps students stay warmer in cold weather.
- Students see a demonstration in which a container with warm water in is placed in cold water. The warm water cools down quickly.
- Students then design and test a “coat” for the container to keep the water warm longer.
- Students watch an animation explaining why a coat helps keep them warm in the cold.
Evaluation
There is no formal student activity sheet or assessment for this lesson. To evaluate student understanding, use your usual methods of interacting with students, asking questions, and discussing ideas with students as they participate in the different parts of the lesson.
Safety
Be sure students wear properly fitting goggles. Never use mercury-containing thermometers in the classroom.
Materials for each group
- Warm water in a cup
- Cold water in a cup
- Thermometer
Materials for the demonstration
- Plastic container, like a deli container
- Clear plastic cup
- Student thermometer (with red liquid, not mercury)
- Warm water
- Ice
- Water
Engage
1. Have a discussion about what students wear on a cold day.
Ask students:
- On a really cold day, is it better to wear a T-shirt or a coat if you are going outside?
A coat
Explain to students that even though some people may not enjoy rainy days, the water we get from rain is very important for people, plants, animals, and all living things.
2. Show an animation to help students understand how to read a thermometer.

Show animation Reading a thermometer.
Tell students that many thermometers have two sets of numbers or two “scales”. Explain that scientists use the scale called the Celsius scale. Show students how to look at the top of the red line to read the number next to it. You might want to point out that 0 °C is the temperature at which water freezes so it’s pretty cold and that the temperatures below zero are even colder.
3. Have students practice using a thermometer.

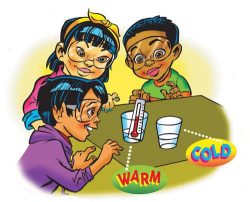
- Give each group of students a small sample of warm and cold water, and a thermometer.
- Before placing the thermometer in water, have students look at the red liquid and try to read the temperature on the Celsius scale. Go around the room and help students read the thermometer.
- Have students place the thermometer in the warm water and watch the red liquid in the tube.
- Go around the room and show students how to read the temperature on the Celsius scale.
- Have students place the thermometer in the cold water and watch the red liquid in the tube.
- Go around the room to help students read the temperature on the Celsius scale.
4. Do a demonstration to show how the temperature changes when a cup of warm water is placed in a container of ice water.
Materials for the demonstration
- Plastic container, like a deli container
- Clear plastic cup
- Thermometer
- Warm water
- Ice
- Water
Have students come close to see the demonstration.

Procedure
- Put warm water (40 °C or about 100 °F) in a small clear plastic cup until it is about ¼- full.
Place a thermometer in the water and read the temperature. Share the temperature with the class. Tell students that the cup of warm water represents a person. - Put ice cubes in the plastic container and add cold water until the container is about ¼ full. Tell students that the cold water represents a cold day outside.
- With the thermometer still in the cup of warm water, place the cup in the ice water (making sure the liquid from the ice water doesn’t enter the smaller cup) and watch the temperature change. Be sure students see the temperature decrease.
Expected results:
The plastic cup insulates the warm water somewhat but the temperature will decrease from about 40 °C to 20 °C in about 2 minutes. The temperature then drops more slowly between 20 °C and 10 °C.
Ask students:
- What do you notice about the temperature of the warm water? Is it getting warmer, colder, or staying the same? How can you tell?
It is getting colder because the red line on the thermometer goes down. - What do you think we can do to keep the water warm longer
Maybe put something around the cup.
Show students cotton balls, plastic wrap, paper, and tape.
- If we use these materials to make a “coat” for the cup, how will we know if it’s a good coat?
Cover the cup with the materials and put warm water in it again, place the cup in cold water, and see what happens to the temperature of the water in the cup.
Explore
Question to investigate: How does a coat keep us warm in cold weather?
5. Have students make a “coat” for their cup.
Materials for each group
- Plastic container, like a deli container
- Clear plastic cup
- Warm water
- Ice
- Water
- Cotton balls
- Plastic wrap
- Paper
- Tape
- Rubber band
Ask students:
- To keep the water warm as long as possible, do you think the coat should be thick or thin?
Thick - What do you think would be a good way to use the plastic wrap?
Use it on the outside to keep the other materials from getting wet.
- Have students use their materials to make a thick water-proof “coat” for the cup of warm water.

Note: One approach could be to wrap the cup with paper, then cotton balls, and then another layer of paper. Use tape as necessary. Cover the entire cup and its layers with plastic wrap to keep water from contacting the other materials. Students will need help putting the materials on the cup so that the materials stay in place.
Before giving a group a container of ice water, look at the materials students are putting around their cup and make suggestions to help them. Before students test their “cup coat” in the ice water, be sure that the outside of the cup is covered with plastic wrap. One way to do this is to cut a piece of plastic wrap and put the cup on it. Then bring the plastic up all around the cup and put a rubber band around the plastic at the top of the cup to hold it in place.
When the group’s cup is ready, add warm water to the cup until it is about ¼ full and give the group a container of ice water.

6. Test the cup in the cold water.
Procedure
- Use the thermometer to measure the temperature of the warm water. Write down the temperature. Leave the thermometer in the warm water.
- Place the cup of warm water in the ice water and watch the temperature. See if the temperature changes as fast as it did before or if it drops more slowly.
Expected results
The temperature of the warm water decreases, but not nearly as fast as it did before.
Explain
7. Show an animation to help explain why a coat helps keep us warm in cold weather.

Show the animation Keeping Warm in the Cold.
Explain that the cup without the coat is like going outside on a cold day with only a T-shirt. The heat from your body moves to the colder air. Losing heat makes you feel cold. This is like when the cup with warm water got colder without a cup “coat”. But when you put on a thick coat, the heat from your body has a harder time escaping into the cold air. It stays near you hand makes you feel warmer. This is like the warm water in the cup with the “coat”. The materials around the cup kept the heat from leaving the water and the water stayed warm for a longer time.
Extend
8. Show pictures of animals that have thick fur or feathers to help keep their bodies warm in cold weather.
Ask students:
- What does each animal use to keep warm in cold weather?
Bird – fluffed up feathers
Bear – curled up with thick fur
Walrus – thick skin with layer of fat
Sheep – thick coat of fluffy wool


