Lesson Overview for Teachers
View the video below to see what you and your students will do in this lesson.
Objective
Students will plan and conduct an absorbency test on four different materials and be able to explain that when testing materials to learn about their properties, the materials need to be tested in the same way. Students will be able to explain that since the materials are made from different substances, they absorb different amounts of water.
Key Concepts
- Testing materials can help identify their properties.
- To compare a property of different materials, the materials all need to be tested in the same way.
- Materials are made from a different substances and absorb water to different extents.
NGSS Alignment
- NGSS 2-PS1-1: Plan and conduct an investigation to describe and classify different kinds of materials by their observable properties.
Summary
- Students help design an absorbency test to see if they can observe a difference in the amount of water that different materials absorb.
- Students place the same size piece of paper, plastic, felt, and aluminum foil in water and observe the amount absorbed.
- Students watch an animation to help understand why some materials absorb water better than others.
- Students apply what they learned to better understand why a towel and a sponge are good absorbers.
Evaluation
Download the Student Activity Sheet (PDF) and distribute one per student when specified in the activity. The activity sheet will serve as the Evaluate component of the 5-E lesson plan.
Safety
Be sure students wear properly fitting goggles.
Materials for each group
- Centimeter ruler
- Plastic (15cm x 15cm square
- Felt (15cm x 15cm square)
- Copier paper (15cm x 15cm square)
- Aluminum foil (15cm x 15cm square)
- 4 small clear plastic cups
- Tablespoon
- Water
- Scissors
Engage
1. Lead a discussion to help students design an absorbency test.
Explain to students that one of the properties of a material they can test is whether or not the material absorbs water.
Note: Some students may not be familiar with the term “absorb” or “absorbency” so you can briefly define and explain the word. Tell students that if a material is absorbent, water goes into it and tends to stay in, like water absorbed into a paper towel.
Have students brainstorm a short list of other absorbent materials and how they are used: Cloth towel to dry off after swimming, or a sponge for cleaning up spills, etc.
Explain that materials that do not absorb water are also useful like the rubber used for rain boots. Have students brainstorm a short list of other non-absorbent materials and how they are used: Umbrellas to stay dry in the rain, rubber or plastic beach balls or toys for the pool, etc.
Tell students that the class will design a test to see which materials absorb water and which do not.
Remind students that when a scientist has a question, they try to set up an experiment that will help them answer the question. Let students know that they can be scientists and help the class come up with a good experiment to see whether or not a material absorbs water.
Ask students:
- How could we set up an experiment to see whether paper, plastic, felt, or aluminum foil absorbs water?
Put each kind of material in water and observe what happens. - Do you think we should try to use the same size piece of paper, plastic, felt, and aluminum foil?
Use the same size piece of each material. - Do you think we should put them in the same amount of water or different amounts?
Put them in the same amount of water at the same time and observe.
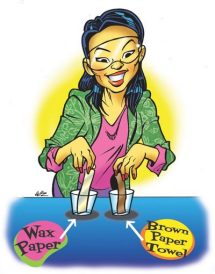
2. Use wax paper and brown coffee filter to demonstrate the absorbency test that students will do.
Materials for the demonstration
- Wax paper
- Brown coffee filter
- Water
- Table spoon
- 2 plastic cups
- Scissors
Begin a discussion by telling students that scientists investigate, describe, and try to understand the things around us. For example, if scientists are studying a rock, they might start by describing the rock’s size, shape, and color. They would also try to find out how hard the rock is and whether it is rough or smooth and shiny or dull. All these words describing what the rock is like are called the “properties” or “characteristics” of the rock. To further illustrate this concept, show a shell, leaf, or pine cone and ask students to describe something special that they notice about the object. Using students’ responses, you can say, “Yes, a property of the shell is that it is pink, or a characteristic of the leaf is that its edges are jagged, or a property of the pine cone is that it has many sections”, etc.

Procedure
- Cut a strip of wax paper and a strip of brown coffee filter (2 cm wide and 10 cm long).
- Pour 1 tablespoon of water into each of two clear plastic cups.
- Demonstrate holding one piece in each cup with only the bottom part of the strip touching the water. Hold the pieces straight up for about 30 seconds.
- Take out the pieces and discuss your observations. Show students how you can tell that the coffee filter absorbed water and the wax paper did not.
Give each student an Activity Sheet (PDF).
Students will record their observations and answer questions about the activity on the activity sheet.
EXPLORE
Question to investigate: Which material absorbs or does not absorb water: paper, plastic, felt, or aluminum foil?
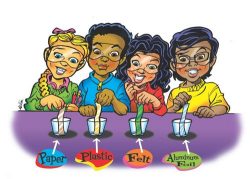
3. Have students conduct an absorbency test on copier paper, felt, plastic, and aluminum foil.
Materials for each group
- Centimeter ruler
- Plastic (15cm x 15cm square)
- Copier paper (15cm x 15cm square)
- Felt (15cm x 15cm square)
- Aluminum foil (15cm x 15cm square)
- 4 small clear plastic cups
- Tablespoon
- Water
- Scissors
Procedure
- Pour 1 tablespoon of water into four clear plastic cups.
- Cut your paper, felt, plastic, and aluminum into strips that are about 2 centimeters wide and 10 centimeters long.
- At the same time, you and your partner place one piece in each cup so that only the bottom part of each strip touches the water.
- Hold the pieces straight up for about 30 seconds.
- Take all the pieces out and look at them closely.
Expected results
The copier paper and felt absorb water but the plastic and aluminum foil do not.
Ask students
- Which materials seemed to absorb water and which did not?
The copier paper and felt absorbed water. The plastic and aluminum foil did not absorb water. - How could you tell which material absorbed water and which did not?
When the paper and felt absorbed water they got darker where the water was and you could feel the water in them. - Which absorbed more water, the paper or the felt?
Felt
Note: Don’t try to measure the amount of water absorbed by either material because it is so small that students will not be able to measure it in milliliters.
EXPLAIN
4. Use an animation to explain why water absorbs into paper and felt but not into plastic or aluminum.
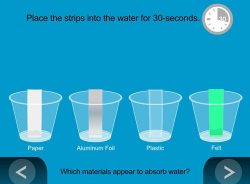
Show the animation Absorbency Test.
Explain that water is made from tiny particles called water molecules. Water molecules are attracted to the paper and move into the tiny spaces between the fibers. The aluminum and plastic are made from material that water is not very attracted to. Also, the aluminum and plastic do not have spaces for the water to move into like felt and paper. Therefore, the aluminum and plastic do not absorb water.
EXTEND
5. Show photos of a sponge and a towel and ask why they are absorbent.
Ask students:
- What do the sponge and the towel have in common with the paper?
The sponge has little holes that the water can travel through. The loops of the towel material also have lots of spaces for the water to travel.


