Lesson Overview for Teachers
View the video below to see what you and your students will do in this lesson.
Objective
Students will develop an understanding that objects and materials can be tested to learn about their properties. Students will help plan and conduct different tests on the materials. Students will be able to explain that when testing materials to learn about their properties, all the materials need to be tested in the same way.
Key Concepts
- Objects and materials have different characteristics or properties.
- Testing materials can help identify their properties.
- To compare their properties, different materials need to be tested in the same way.
NGSS Alignment
- NGSS 2-PS1-1: Plan and conduct an investigation to describe and classify different kinds of materials by their observable properties.
Summary
- Students test a piece of aluminum foil, plastic from a zip-closing plastic bag, and copierpaper to learn about some of their properties.
- Students conduct tests on the materials and then help design a strength test. The pointis stressed that for a good, fair test each material needs to be tested in the same way.
- A simulation is shown that emphasizes the point that the different properties ofmaterials are good for different uses.
Note: This lesson may work best if done over two days.
Evaluation
Download the Student Activity Sheet (PDF) and distribute one per student when specified in the activity. The activity sheet will serve as the Evaluate component of the 5-E lesson plan.
Safety
This lesson uses common classroom or household materials that are considered nonhazardous. Follow all classroom safety guidelines. If doing this activity in a lab setting, students should wear properly fitting goggles. Wash hands after doing the activity.
Materials for each group
- 2 pieces of plastic (from plastic sandwich bag, 15 cm x 15 cm square)
- 2 pieces of copier paper (15 cm x 15 cm square)
- 2 pieces of aluminum foil (15 cm x 15 cm square)
Teacher Preparation
Cut plastic sandwich bags apart so that you make squares of plastic that are about 15 cm x 15 cm.Cut copier paper and aluminum foil into 15 cm x 15 cm squares. Prepare enough pieces ofeach material so each group of students gets one of each.
Note: You will also need to cut a piece of felt or other fabric into a 15 cm x 15 cm square to demonstrate the different tests that students will do with their materials.
Engage
1. Have a class discussion about how to investigate the properties of plastic, paper, and aluminum foil.
Tell students that they will be trying to compare and learn more about the properties of three different materials: plastic, paper, and aluminum foil.
Ask students:
- What could we do to learn more about the properties of the materials other than just looking at them or touching them?
Maybe the materials can be tested in some way to learn more about them.
Tell students that the materials can be tested in different ways to learn about their properties. Explain that they will conduct four tests: a Fold test, Crinkle test, Tear test, and Stretch test. Tell students that before they do each test, you are going to model the test using a piece of felt. Tell students that you and the class will make careful observations about how the felt behaves in each test and will record your observations, and that the students will then do the same for their tests.
Give each student an Activity Sheet (PDF) for the first part of the lesson.
Students will record their observations and answer questions about the activity on the activity sheet.
Explore
2. Have students record observations they make about the materials bylooking at and touching them.
Question to investigate: What are some properties of plastic, paper, and aluminum foil that you can easily observe?
Materials for each group
- 2 pieces of plastic (15 cm x 15 cm square)
- 2 pieces of copier paper (15 cm x 15 cm square)
- 2 pieces of aluminum foil (15 cm x 15 cm square)

Before students make their observations, use a piece of felt to model the types of observations students might make. Use the same format as shown on the Student Activity Sheet to write down the properties of the felt. Tell students that the felt is:
- Soft
- Thick
- Opaque (can’t see through)
- Flexible
- Green (or other color)
Procedure
- Look at and feel each of the different materials.
- Use the Student Activity Sheet to record the observations you make for each material.
3. Use a piece of felt to demonstrate the four tests students will do on paper, plastic, and aluminum foil.

Fold Test
While students observe, fold the piece of felt in half and press your finger down along the folded edge. Put the folded felt down to see how it behaves.
Ask students to conduct the “Fold Test” on their pieces of plastic, paper, and aluminum foil. Remind students that after each test, they should record their results on the Student Activity Sheet.
Expected results
Plastic stays folded pretty flat, paper folds but comes up a little when released, aluminum foil folds and stays down very flat.
After students complete their tests, ask them to describe some of their observations.

Tear Test
While students observe, use your thumb and index finger from both hands to try to tear the felt.
Ask students to conduct the “Tear Test” on the plastic, paper, and aluminum foil. Tell students to try to use the same amount of force when they try to tear each one. Remind students that after each test, they should record their results on the Student Activity Sheet.
Expected results
Aluminum foil is very easy to tear, paper is a little harder to tear, and plastic is the most difficult to tear.
After students complete their tests, ask them to describe some of their observations.
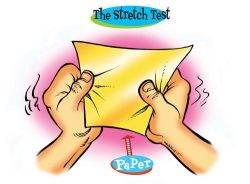
Stretch Test
While students observe, firmly hold opposite ends of the felt and slowly pull in opposite directions.
Ask students to do the “Stretch Test” on their pieces of plastic, paper, and aluminum foil. Tell students to try to use the same amount of force when they pull on each material. Remind students that after each test, they should record their results on the Student Activity Sheet.
Expected results
Plastic stretches but paper and aluminum foil do not stretch.
After students complete their tests, ask them to describe some of their observations.
Let students know that the tests they did helped them discover some different properties or characteristics of the materials.
END OF SESSION FOR DAY 1
BEGINNING SECOND SESSION (Next Day)
4. Review the main points from the first part of the lesson.
These key points can be stated by you or you can ask students what they remember from the previous session (or a combination of the two):
- Objects and materials have different characteristics or properties.
- Materials can be tested to help identify their properties.
- To compare a property of different materials, the materials need to be tested in the same way.
- Review the materials students tested and the results: (plastic, paper, and aluminum foil were put through the fold, crinkle, tear, and stretch tests).
Give each student an Activity Sheet for the Strength Test (PDF).
Students will record their observations and answer questions about the activity on the activity sheet.
Explore
5. Have students help design an experiment to compare the strength of each material for holding up weight.
Question to investigate: Is paper, plastic, or aluminum foil the strongest for holding up weight?
Ask students
- If we wanted to compare the strength of pieces of aluminum foil, plastic, and paper for holding up weight, what kind of test could we try?
Explain to students that if they want to compare a certain property of different materials, they need to come up with a test for that property. Guide students to suggest that they would need to use the same size and shape piece of each material to test. They would need to add the same kinds of weight to each piece and see when the piece bent or failed in some way.
6. Use a piece of felt to demonstrate a “strength test” that students will do.
Demonstrate the strength test that students will do by using a piece of felt that is 15 cm long and 5 cm wide. Have students predict how many pennies the strip of felt will hold. Write down a few predictions.
Materials
- Two books of the same thickness (minimum 3 cm)
- Centimeter ruler
- 10 pennies
- Strip of felt (5 cm x 15 cm)
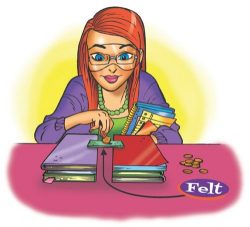
Procedure
- Put the books on the table so they are about 3 cm apart, as shown.
- Place the felt strip across the books so that the same amount of felt is on each book.
- Very carefully place one penny in the center of the felt.
- Continue adding pennies carefully, one-by-one, to make a stack, until the weight of the pennies makes the felt collapse. Record the number of pennies that the felt was able to support before it collapsed.
7. Have students conduct the strength test on paper, plastic, and aluminum foil.
Materials for each group
- Two books of the same thickness (minimum 3 cm)
- Centimeter ruler
- 10 pennies
- Plastic (15 cm x 15 cm square)
- Paper (15 cm x 15 cm square)
- Aluminum foil (15 cm x 15 cm square)
- Scissors
Have students predict how many pennies each material will be able to hold and which material will be the strongest. When they finish each strength test, they should record the actual number of pennies held and identify the strongest material.

Procedure
- Cut your paper, plastic, and aluminum foil into strips that are 15 cm long and 5 cm wide.
- Put the books on the table so they are about 3 cm apart as shown.
- Place the paper strip across the books so that the same amount of paper is on each book.
- Very carefully place one penny in the center of the paper.
- Continue adding pennies carefully, one-by-one, to make a stack, until the weight of the pennies makes the paper collapse. Record the total number of pennies added when the paper collapsed.
- Repeat steps 3-5 to test the aluminum foil and then the plastic.
Ask students:
- Which material was the strongest? Which was the weakest? Which was in-between?
Expected results
The paper held up the most pennies and was the strongest. The plastic held up the fewest pennies and was the weakest. The aluminum foil was in-between.
Explain
8. Show a close-up image of paper to explain why it held up the most weight.
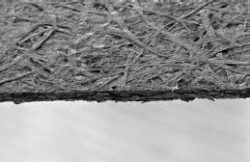
Show the magnified photograph of paper.
Explain that paper, plastic, and metal aremade from different substances and in different ways so they have different strengths.
Note: Normally, metal is stronger than paper or plastic if all thematerials are the same thickness. But the aluminum foil is muchthinner than either the plastic or the paper.
The paper is about the same thickness as the plastic but it has lotsof fibers pressed together in random criss-cross directions thathelp make the paper stiffer and stronger.
Extend
9. Show a simulation that demonstrates different properties are useful for making different things.

Show an interactive simulation that demonstrates that different materials have properties that make them good for certain uses.
Explain that because different materials have different properties, they are used to make different things. Rocks are hard so they are used to make cement for sidewalks or stone for buildings. Cotton is soft and has lots of thin fibers. It is used to make thread and yarn which can make soft fabrics and comfortable clothes.
Let students know that if they want to make something that works for a certain purpose, they need to use materials that have the right properties.
The book What if Rain Boots Were Made From Paper, written by Kevin Beals and P. David Pearson, and illustrated by Tim Haggerty makes an excellent read-aloud to accompany this lesson. When you choose to read the book in the lesson is up to your own personal preference.


