Lesson Overview for Teachers
View the video below to see what you and your students will do in this lesson.
Objective
Students will use what they know about the properties of paper, plastic, and aluminum foil to decide how the materials can be used for a specific purpose.
Key Concepts
- Materials with certain properties are good for specific purposes.
- Designing and making a product takes testing and making changes and testing again.
NGSS Alignment
- NGSS 2-PS1-2: Analyze data obtained from testing different materials to determine which materials have the properties that are best suited for an intended purpose. (This performance expectation integrates traditional science content with engineering through a practice or disciplinary core idea.)
Summary
- Demonstrate making a paper boat to guide students, who work in pairs, to make their own paper boat.
- Place the boat in water and demonstrate how many pennies the boat can hold before sinking. Students are then guided to think of ways to improve the boat by covering it with water proof material.
- Students make the same paper boat and cover it with plastic and aluminum foil.
- Students test the boat to see if it holds more pennies than the original paper boat.
Evaluation
Download the Student Activity Sheet (PDF) and distribute one per student when specified in the activity. The activity sheet will serve as the Evaluate component of the 5-E lesson plan.
Safety
Be sure students wear properly fitting goggles.
Materials for the demonstration
- Paper Boat Template (PDF)
- Centimeter ruler
- 80+ pennies
- Plastic (15cm x 15cm square)
- Copier paper (15cm x 15cm square)
- Aluminum foil (15cm x 15cm square)
- Scissors
- Tape
- Container with water
Teacher Preparation
Cut plastic sandwich bags apart to make squares of plastic that are about 15cm x 15cm. Cut copier paper and aluminum foil to the same size squares as the plastic. Prepare enough pieces of each material so each group of students gets one of each.
ENGAGE
1. Guide students to make a basic boat from paper.
Remind students that they discovered that paper was stronger than plastic or aluminum foil. Explain that you and the students will make a basic boat out of paper and that you will demonstrate how many pennies it can hold before sinking. Explain that paper is a good material for folding and taping into a boat shape but not good because it absorbs water. Tell students that after the demonstration, they will be able to make changes to their boats to see if they can hold more pennies before sinking.
Note: Students should work in pairs to make a boat. Students will likely need a fair amount of guidance to make the folds and to tape the paper in the right places. This may be a challenge for students. Be sure to tell students that it is important to tape the corners well. The boat will look like a shallow open 4-sided box.
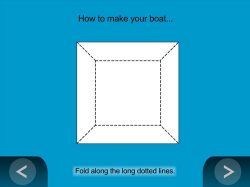
Show the animation Making a Boat.
Use the animation and a piece of paper to demonstrate how to make a boat. You will also use this boat in the demonstration to see how many pennies it can hold.
Materials for each group
Procedure
- Have students fold on the four main dotted lines and then open the folds.
- Next, fold on one of the short diagonal lines on one of the corners.
- Then bend that folded corner piece to one of the sides and tape it to that side.
- Have students repeat steps 1 - 3 for each of the corners to make an open 4-sided box (boat).
Ask students
- What do you think would happen if we used this boat in the water? Do you think it could hold a lot of pennies without sinking?
It might hold some for a while but the paper will absorb water and get weak and sink.
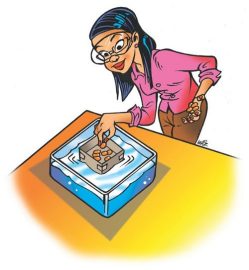
2. Have students come to the front of the class to see you demonstrate how many pennies the paper boat will hold.
Procedure
- Place the paper boat in a container of water and add pennies, one-at-a-time, to the middle of the boat.
Note: You don’t need to stack the pennies in a vertical column. They can be in a pile spread evenly in the boat. Do not add the pennies too quickly because you will get an artificially high number. Just add them at a steady pace. (You actually want to give the paper time to absorb water and to weaken before you’ve added a large number of pennies.)
Expected results
Depending on the paper used, it will absorb water quickly or slowly and then weaken. The paper will darken as it absorbs water. Depending on the paper used, the boat may hold from 30-40 pennies before the wet paper collapses and the boat sinks. (Results will vary.)
Ask students:
- What do you think was the main reason the boat sunk?
The paper absorbed water and got weak. - What do you think we could add to the boat to make it hold more pennies?
Students may suggest covering the boat with non-absorbent material like plastic or aluminum foil or both. - Why might that be a good idea?
Students should suggest that the plastic and aluminum foil can protect the paper from getting wet and keep it from getting weak.
Give each student an Activity Sheet (PDF).
Students will record their observations and answer questions about the activity on the activity sheet.
EXPLORE
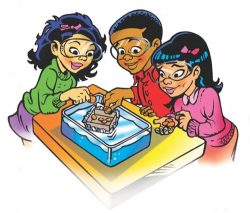
3. Have students cover their boat with plastic or aluminum foil or both and test their boat.
Question to investigate: How can you use paper, plastic, and aluminum foil to design and build a boat that holds the most weight without sinking?
Materials for each group
- Centimeter ruler
- 80+ pennies
- Plastic (15cm x 15cm square)
- Copier paper (15cm x 15cm square)
- Aluminum foil (15cm x 15cm square)
- Scissors
- Tape
- Container with water
Note: Demonstrate using a “fresh” paper boat (that isn’t wet), how students can use plastic, aluminum foil, and tape to cover their boats. When demonstrating, be sure to show students how to cover all four sides of the boat with plastic and how to tape it down. Stress that it is important to make the boat as waterproof as possible.
Procedure
- Use plastic, aluminum foil, and tape to cover your boat.
- Put your boat in the water and test it to see how many pennies it can hold without sinking.
Expected results
Results will vary but the boat covered in plastic and aluminum foil should hold more pennies than the simple paper boat. In our tests, the covered boat held more than 80 pennies before sinking.
EXPLAIN
4. Have a class discussion about why the aluminum foil and plastic helped the boat hold more weight.
Explain that since the plastic and aluminum foil do not absorb water, the water could not touch the paper and could not absorb into it and make it weak. That helped the boat stay stiffer longer without collapsing and sinking. Also, the more “watertight” they made their boat (with the help of the tape), the less water seeped in, making the boat better able to stay afloat and to hold more weight (the pennies).
EXTEND
5. Explain that a juice box is like an inside-out-boat.
Bring in a juice box that you have cut open and peeled back the layers to show students how it is made.
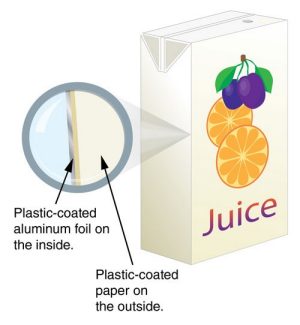
Explain to students that the boat they made is like a box that needs to keep liquid (water) on the outside. A juice box is a box that needs to keep liquid (juice) on the inside.
Juice boxes are made from stiff paper. They have an inside lining of plastic and aluminum foil so the paper doesn’t get soggy and weak from the inside. They are like an inside-out version of the boat students made. Their boats had an outside lining of aluminum foil and plastic so the paper didn’t get soggy and weak from the outside.
Remind students that the properties of materials are important when thinking about making a product that needs to work in a certain way.

