Lesson Overview for Teachers
View the video below to see what you and your students will do in this lesson.
Objective
Students will be able to develop and explain a particle-level model to describe evaporation and condensation in the context of the water cycle.
Key Concepts
- The water cycle depends on the processes of evaporation and condensation.
- Evaporation happens when water molecules at the surface of a liquid move fast enough to break away from other water molecules and escape from the liquid into the air.
- Condensation happens when water molecules in the air slow down enough to join together to form liquid water.
- In the water cycle, water from lakes, rivers, and oceans evaporate and enter the atmosphere where it cools, condenses into liquid water, and comes back to Earth as rain.
NGSS Alignment
- NGSS 5-PS1-1: Develop a model to describe that matter is made of particles too small to be seen.
Summary
Students have been introduced to the idea that matter is made up of tiny particles that are too small to see. They have investigated these atoms and molecules in the context of dissolving and evaporation. In this lesson:
- Students build on these ideas by creating a physical model of the water cycle.
- Students use water, ice, and plastic wrap to model the ocean and cold upper atmosphere.
- Students use observations from their model to explain the processes of evaporation and condensation that drive the water cycle.
Evaluation
Download the student activity sheet and distribute one per student when specified in the activity. The activity sheet will serve as the Evaluate component of the 5-E lesson plan.
Safety
Make sure you and your students wear properly fitting safety glasses or goggles.
Clean-up and Disposal
Remind students to wash their hands after completing the activity.
All common household or classroom materials can be saved or disposed of in the usual manner.
Materials for each group
- Clear plastic container, such as a medium-size deli container
- Water
- Zip-closing plastic bag (snack size)
- Plastic wrap
- Rubber band
- Ice cubes (2–3)
Engage
1. Introduce the idea of building a model of the water cycle.
Remind students that they have seen and used drawings and animations as models of a solid, liquid, and gas. Tell students that they will make a different kind of model to show the water cycle. They will use water in a container to represent a lake, ice to model the cold upper atmosphere, and light from the window to represent sunlight.
Give each student an Activity Sheet (PDF).
Students will record their observations and answer questions about the activity on the activity sheet.
Explore
2. Have students create a model of the water cycle.
Question to investigate: What are the main processes in the water cycle that make it rain?
Tell students that you will help them build a physical model of a lake, the atmosphere, and the Sun to show where rain comes from and how it’s formed.
Note: If you want students to practice measuring, you could have them measure and mark a height in centimeters from the bottom of the container and then pour water to that height. Or, students can measure the volume of water in milliliters using a beaker or graduated cylinder.
Materials for each group
- Clear plastic container, such as a medium-size deli container
- Water
- Plastic wrap
- Rubber band
- Zip-closing plastic bag (snack size)
- Ice cubes (2–3)
Procedure
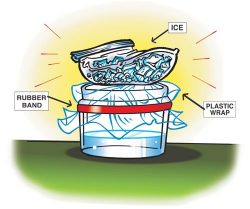
- Pour room-temperature water into a clear, plastic container so it is about ¼ full. This is a model of a lake or an ocean.
- Place a piece of plastic wrap over the container. With the help of a partner, use a rubber band to hold the plastic wrap on the container.
The plastic wrap is a model of the level of the sky where most of the weather happens. - Put 2 or 3 ice cubes into a zip-closing plastic snack bag. Place the plastic bag on the plastic wrap as shown.
The ice is used to make the plastic wrap cold because the area of the sky where weather happens is cold. - If you have a lamp, follow your teacher’s instructions to shine it on your model. If you don’t have a lamp, carefully bring your model over to the window where it can get light from outside. The light is a model of the sun.
Let the models sit for about 15 minutes. During that time, have a class discussion about evaporation and condensation.
Explain
3. Have a class discussion and show an animation about evaporation and condensation
Ask students:
- What eventually happens to water that’s left outside or water in a puddle? Where does it go?
It evaporates into the air.
Show the animation Evaporation.
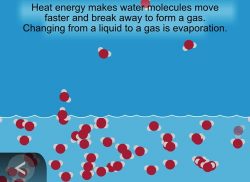
Explain that water molecules leave the liquid state and form water vapor, a gas. The molecules in water vapor become part of the air. The process of water leaving a liquid and becoming a gas is called evaporation.
Let students know that evaporation is an important part of the water cycle and that they will see evidence of evaporation in their water cycle model.
Show the animation Condensation.
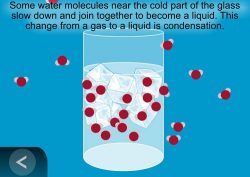
Explain that when water molecules in the air are cooled, they move more slowly, and come together to form tiny droplets of water. The process of water vapor cooling and becoming liquid water is called condensation.
Let students know that condensation is an important part of the water cycle and that they will see evidence of condensation in their water cycle model.
- Have students remove the plastic bag with ice from the plastic wrap on top of the container.
Ask Students:
- What do you notice about the inside of the plastic wrap?
It has water drops on it.
Ask students:
- Where do you think these water drops came from?
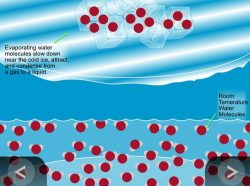
Evaporation from the water formed molecules of water vapor, which condensed on the cold plastic.
Show the Animation Water Cycle Model.
Explain to students that the water in the container evaporates and that those water molecules cool down and condense to form water again. Explain to students that this process of evaporation and condensation makes rain happen and is called the water cycle.
Have students use the activity sheet to make a drawing of water molecules evaporating and then condensing as part of the water cycle.
Extend
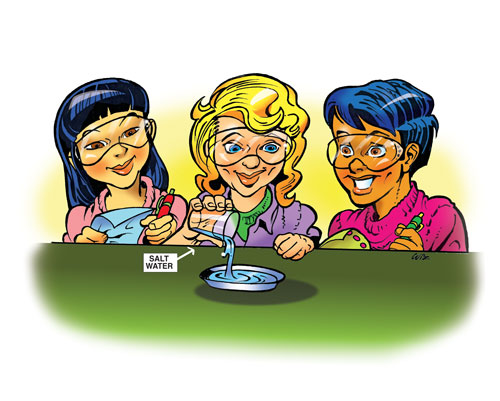
4. Relate what you observed in a previous lesson when salt water was allowed to evaporate to a device that can be used to purify salt water for drinking.
Remind students that in the previous lesson, they saw that when salt water evaporated and changed to water vapor, only the water evaporated, not the salt. Students saw that the salt crystals formed again and that this salt could be collected and used. But what about the water that evaporated? Could that water be collected and reused?
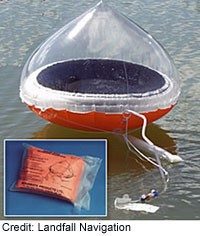
Tell students that the process of evaporation and condensation from the water cycle can be used to purify salt water for drinking. The devices that make this possible are called desalination devices.
Explain that people living on a boat or on an island in the ocean without access to fresh water can use a desalination device to make fresh water that they can drink to survive.
5. Show students small portable desalination device and give them a short assignment.
For homework or a short research assignment, have students read the article (link provided) about different techniques used for desalination. Have students describe how the floating desalination device works and how they think it could be improved. You could also have students design a modified device or a completely different one of their own based on information in the article and their knowledge of the water cycle.
Note: Students may think that it’s strange that condensation can occur in the desalination device even though there is no ice or other means to cool the water vapor. Let students know that if the concentration of water vapor is high enough, condensation can occur at higher temperatures. When there are so many water molecules in a container, they hit each other more frequently and more are going slow enough to attract others and condense.