;void(0);)
We don’t normally think of batteries as being natural, but the parts that make them originally got their start in nature! In this activity you will build a battery using potatoes, lemons, and metal nails. It’s easier to recognize these items as coming from nature. Potatoes and lemons are harvested from plants. Metals come from rocks, called ores, that are mined from the ground. Follow the instructions in this activity to turn items, that originally came from plants and rocks, into a battery!
Questions to Investigate
- Can you build a battery out of potatoes that is powerful enough light a small LED bulb, sound a buzzer or spin a propellor on a tiny motor?
Safety Requirements
- The ends of nails are sharp. Be careful when pushing nails into potatoes or lemons.
- Do not eat the potatoes or lemons after experimenting with them.
Materials
- 10 copper roofing nails or pennies
- 10 galvanized (zinc-plated or hot dip) nails
- 10 aluminum nails
- 11 wires with alligator clips on both ends
- 10 potatoes
- 3 lemons
- Digital voltmeter
- Choose at least one of the following items:
- Small light emitting diode (LED), 5 mm bulb, any color (2.0V - 2.8V)
- Small buzzer (1.5V or 3V)
- Motor with a propellor (1.5V or 3V)
Note: You will reuse the three potatoes tested in Part 1 in Part 3.
Procedure
Part 1: Find the voltage made by different pairs of electrodes in a potato
- Use the chart below to determine which pair of metals you will place in each of three potatoes.
- Push the nail that will be the “first electrode” into a potato. Position the nail that will become the “second electrode” 2 to 2½ inches (45-50 mm) away from the first nail and push it into the same potato.
- Make sure the nails do not touch.
Potatoes | First electrode | Second electrode | Voltage (V) |
Potato 1 | Zinc nail | Copper nail |
|
Potato 2 | Zinc nail | Aluminum nail |
|
Potato 3 | Aluminum nail | Copper nail |
|
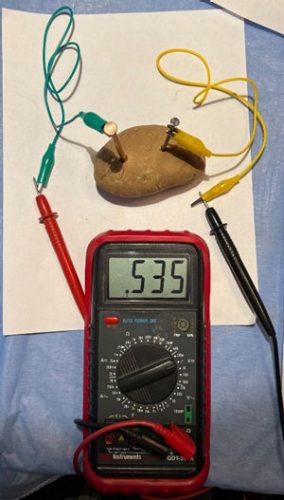
- Get help from someone with experience using a digital voltmeter. Turn the dial to measure volts. Then, at the same time, touch each electrode with either the red or black probe. The voltage readout should be positive, so if there is a “-” sign switch which probe touches which electrode.
- Write the voltage reading from the voltmeter (only the positive number or number without a “-” sign) in the chart above.
- Continue this process until you have measured the voltage for all three pairs of electrodes each in their own potato.
- Which pair of electrodes produced the highest voltage?
- Mark this pair in the chart above so that you remember which metals became the best electrodes when inserted into a potato.
Part 2: Find the voltage made by different pairs of electrodes in a lemon
- Roll three lemons with your hands to make them extra juicy inside. Then using the same process you used for the potato, find the voltage for three pairs of electrodes each in their own lemon. Write the voltages in the chart below.
- Remember that the voltage readout should be positive. If there is a “-” sign switch which probe touches which electrode. Then write this positive number in the chart below.
Lemons | First electrode | Second electrode | Voltage (V) |
Lemon 1 | Zinc (Zn) nail | Copper (Cu) nail |
|
Lemon 2 | Zinc (Zn) nail | Aluminum (Al) nail |
|
Lemon 3 | Aluminum (Al) nail | Copper (Cu) nail |
|
- Which pair of electrodes produced the highest voltage? Mark this pair in your chart.
Part 3: Connect potatoes by their electrodes
- Look back at your charts for the potato and lemon tests to choose the best pair of electrodes to use in the next portion of this activity. Decide which metal will be the “first electrode” and which will be the “second electrode.” Then write this in the chart on page 5.
- For example, if the zinc and copper nails where the best electrodes, you would write Zn in the chart for one of the electrodes and Cu in the chart as the other electrode.
- Because you will use the same electrodes in the same way for all 10 potatoes, write the abbreviation for each metal down the entire column.
- Using the same process you used for the potatoes in Part 1, insert pairs of electrodes into each of 10 potatoes.
One potato
- Check the voltage of the electrodes and potato in just one potato by touching one electrode with the red probe and the other electrode with the black probe of the voltmeter.
- Remember that the voltage readout should be positive. If there is a “-” sign switch which probe touches which electrode. Then write this positive number in the chart on page 5.
- Remember that the voltage readout should be positive. If there is a “-” sign switch which probe touches which electrode. Then write this positive number in the chart on page 5.
- Attach two separate wires with alligator clips as shown. Then attach the free alligator clips to a small LED bulb, buzzer or motor with propellor. Answer the question in the chart about whether the device you used worked.

Two potatoes
- Use another wire with alligator clips on both ends to connect a second potato to the series, as shown in the diagram.
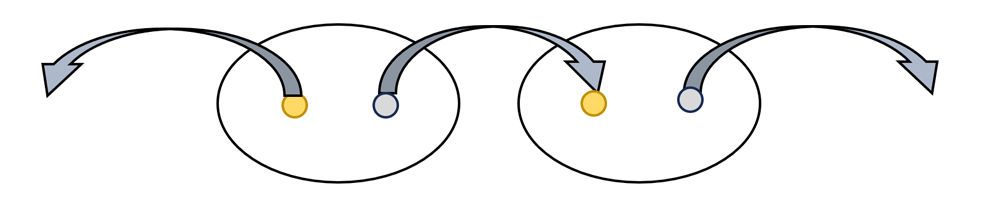
- Check the voltage produced by two potatoes and their electrodes by clipping each free alligator clip directly onto the red and black probes with a digital voltmeter. If the reading is negative, switch the clips that each probe is connected to.
- Write the voltage in the chart in the row for two potatoes.
- Attach the free alligator clips to a small LED bulb, buzzer or motor with propellor. Then answer the question in the final column of the chart about whether or not the device you used work in the chart.
- Use an up arrow (↑) to indicate whether it’s brighter, louder, or faster.
- Use a down arrow (↓) to indicate whether the device seems to be dimmer, quieter, or slower.
- Use the approximately equal to sign (≈) to indicate whether the device is acting about the same.
Three potatoes
- Use another wire with alligator clips on both ends to connect a third potato to the series, as shown in the diagram.
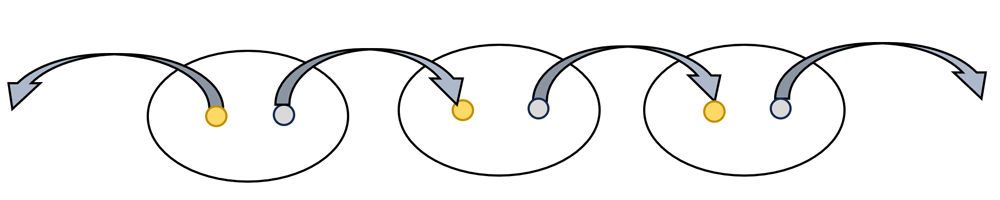
- Check the voltage produced by three potatoes and their electrodes with a digital voltmeter.
- Connect either an LED bulb, buzzer or motor with propellor. Then answer the question in the final column of the chart.
More potatoes
- Continue adding one potato at a time to your series, testing, and recording your observations in the chart until you have connected and tested a series that is ten potatoes-with-electrodes long. Are you seeing a trend?
| What happens each time you add a potato-with-electrodes to the series? | |||||
Number of potatoes in the series | First electrode | Second electrode | Voltage (V) | Did the bulb, | Is the light, sound, or speed increasing, decreasing, or staying the same? |
1 |
|
|
|
| N/A |
2 |
|
|
|
|
|
3 |
|
|
|
|
|
4 |
|
|
|
|
|
5 |
|
|
|
|
|
6 |
|
|
|
|
|
7 |
|
|
|
|
|
8 |
|
|
|
|
|
9 |
|
|
|
|
|
10 |
|
|
|
|
|
How does it work?
Batteries, including the one you made in this activity, have the same key parts—two electrodes and an electrolyte. In this activity, the metal nails are the electrodes, and the electrolyte is either the inside of a lemon or a potato.
- Electrodes must be made of different metals. As you discovered, certain pairs of metals work better than others.
- Potatoes make good electrolytes because they have salts inside of them. Lemons are good electrolytes because they have a combination of different acids, including citric acid and ascorbic acid (a.k.a. Vitamin C) inside of them.
Electrolytes do two things within a battery. The first is that they block the flow of electrons between the two electrodes inside the battery. The electrons made at the zinc nail cannot get to the copper nail by going through the potato. Instead the electrons must move from the zinc nail, through the wire, into one part of the bulb, buzzer, or tiny motor, out another part of the device, through another wire, and to the copper nail. This pathway is why we can use electricity power our flashlights and phones.
The second role of an electrolyte is to chemically react with the electrodes to so that there are electrons that need to move. The salts in the potato and acids in the lemon reacted with the zinc electrode freeing up electrons. Once the electrons traveled through the bulb, buzzer, or motor, and returned to the copper electrode, they were transferred to the electrolyte around it which reacted to release a small amount of hydrogen gas. These reactions, set up the situation for electrons to move and electricity to flow.
It is possible, although not exactly practical, to make a battery out of potatoes or lemons, and copper and zinc nails. How many potatoes, nails, and alligator clips do you think it would take to make a flashlight bright enough to take camping? Whatever the number, it would certainly be more than could fit inside these devices at the size they are now. Could you imagine lifting a flashlight made of ten potatoes-with-electrodes and wires? Fortunately for us, scientists have figured out how to make batteries that are small, efficient, and light enough to carry. Better yet, scientists continue to work to make batteries that are even more convenient, are safer for people, animals, and the environment, and work better than those that you use every day.
References:
- CCEW 2024 Theme Team Member, Dr. Veronica Jaramillo, Dean of the Department of Natural Sciences and Chemistry Professor at Pasadena City College
- Activity based on How to Create a Potato Battery from wikiHow