Project Based Lessons - Chemical Reactions & Engineering Design
NGSS Standard: MS-PS1-6
Undertake a design project to construct, test, and modify a device that either releases or absorbs thermal energy by chemical processes.
Introduction
In Chapter 5, students learned how the process of dissolving different substances can result in an increase or decrease in temperature. In Chapter 6, students saw that different chemical reactions can also be exothermic or endothermic.
This engineering design lesson gives students an opportunity to apply these temperature-changing chemical processes to the problem of making a device to achieve and maintain a particular temperature range for a very specific purpose. This lesson is expected to take approximately two class periods plus additional time for students to imagine, draw, and describe their temporary portable reptile egg incubator.
Key Concepts
- The goal of engineering is to design an object or process to solve a problem.
- To design a solution to a problem, engineers need to define the features that will make the object or process successful (criteria) and those that may interfere with the success (constraints).
- Engineering involves designing and testing a model/prototype and modifying, improving, and optimizing the prototype based on testing.
- Designing a device that uses a chemical reaction to reach a certain temperature range requires testing, measuring, and refining the quantities of substances and modifying the materials for an optimal design.
Summary
This lesson begins with a story about rescuing reptile eggs from a new construction site. Using the story as motivation, students are presented with an engineering design challenge: Build a portable device which can warm, support, and protect one reptile egg as it is moved from a construction site to a nearby reptile conservation center.
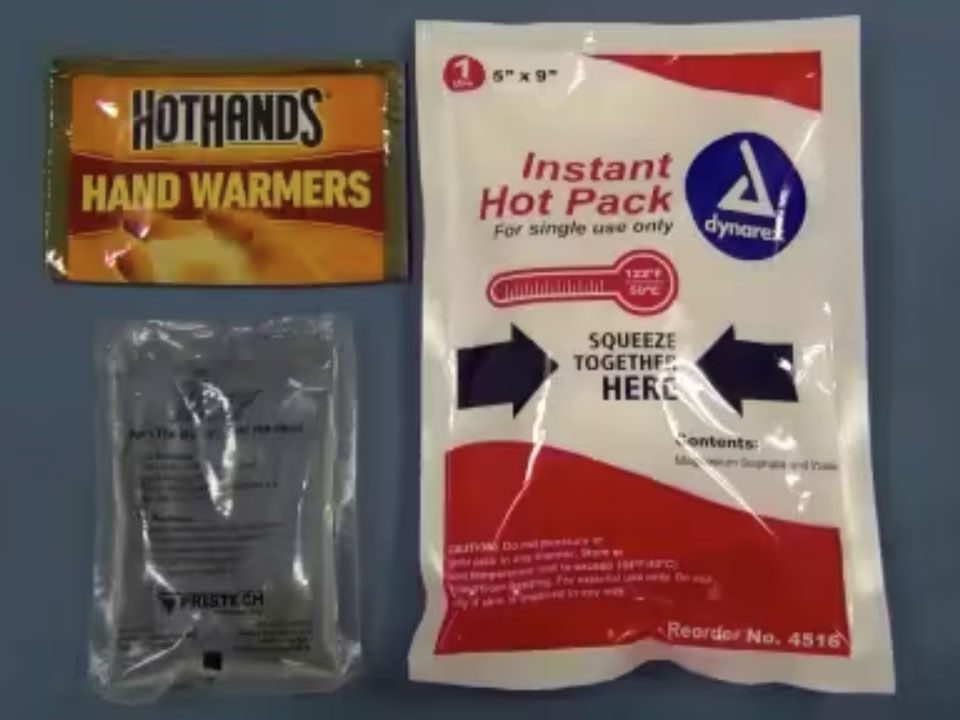
After observing different heat packs, students discuss the criteria and constraints related to designing a heat pack as the basis for their device. Students investigate calcium chloride as an exothermic dissolver, and then move on to calcium chloride and baking soda as the exothermic chemical reaction which will serve as the heat source for their device.
Students adjust the amounts of the reactants (water, calcium chloride and baking soda) to achieve the right temperature range and then test a prototype in a sealed zip-closing plastic bag.
Students use their findings and ideas about insulation and heat transfer to draw an optimized design that 1) Keeps an egg at the ideal temperature, 2) Holds an egg in the proper orientation, and 3) Protects the egg from impact. Each student or student group draws this device and explains how the device meets each of the three criteria.
Engineering Design Process
This lesson follows the engineering design process described below.
- Define the Problem
In the story, the eggs need to be moved while they are protected and kept at a specific temperature range. Students observe heat packs that use different chemical processes as possible heat sources for their device. As a class, students identify the features the device should have to be successful (criteria) as well as the factors that might limit or impede the development of a successful design (constraints). - Develop Possible Solutions
After determining the target temperature range, students use water and different amounts of calcium chloride and baking soda to achieve the right temperature and produce enough gas to support the egg and cushion against impact. - Optimize the Design
Students discuss and draw a model of their device and describe how certain features heat and support the egg. These features include the container, how the heat pack is incorporated to support the egg, and materials used to insulate the container.
Objective
Students will design, test, modify, and optimize a device that uses a chemical reaction to reach a specific temperature range for a portable reptile egg incubator.
Note: Students will not be expected to build every element of the heat pack such as incorporating a pouch of water into the pack. Their main goal is to achieve the target temperature range and to design, on paper, the final device.
Download All Lesson Resources
Get the entire lesson plan and Student Activity Sheet for "Lesson 6.11 - Project Based Lessons: Chemical Reactions & Engineering Design."
Instructions
1 Define the Problem
Step 1
Help students identify the problem that their engineering design process will try to solve.
The following story is included on the Student Activity Sheet. This story introduces the design challenge and serves as motivation for the lesson. Either read it aloud or have students read it silently.
Imagine that you are a volunteer with a reptile conservation center. One important project is to rescue reptiles (turtles, snakes, and lizards) that are in the unlucky position of living in the path of new construction. Typically, in these cases, animals move. They search for new homes and food sources nearby. However, eggs cannot crawl, slither, or swim to another location. And construction projects will not wait for eggs to hatch.
You have talked with construction workers at a site who agreed to notify you if they find reptile eggs. The center is able to incubate the eggs until the babies hatch and then return them to the wild. Your role is to design a reptile egg incubation device that keeps an egg warm and safe as it is transported from the worksite to the reptile conservation center.
Reptile eggs are leathery and soft. While they are not prone to crack easily, they need to remain in the same orientation they were originally laid— whatever is facing up, must stay facing up. They cannot be flipped, turned, or jostled. Very importantly, the eggs must be kept warm, but not too warm, to properly develop and hatch.
You have a job to do before the first batch of eggs is found— build a temporary portable reptile egg incubator device that will keep one egg warm and properly positioned while you take it to the reptile conservation center. Let’s give these young lizards, turtles, and snakes their best chance at life!
Tell students that in this lesson, they will conduct activities to develop a portable reptile egg incubator device. The device will need to warm, support, and protect one egg.
Step 2
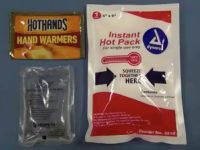
Show the video of different heat packs to serve as a starting point for the design of a portable reptile egg incubator.
Tell students that there are a variety of heat packs that use different chemical processes to heat up. One of these processes could be used to begin development of their egg incubator device.
One type of heat pack contains a fine iron powder, salt, and water in a pouch that is permeable to air. When it is exposed to air, the iron begins to rust. This rusting process produces heat.
Another type of hand warmer contains a solution of the chemical sodium acetate and a small metal disc. When the disc is bent, crystals of sodium acetate begin to form. This process of changing from a liquid to a solid produces heat.
Another type of heat pack contains a solid, such as magnesium sulfate, and a pouch of water. When the pouch of water is broken, the magnesium sulfate begins to dissolve. Dissolving this type of magnesium sulfate produces heat.
Let students know that they will begin the development of their egg incubator device by using a dissolving process.
Step 3
Discuss the criteria and constraints for a successful design.
Explain to students that the features the device must have are called the criteria.
Ask students:
If you think about a heat pack as the basis for an egg incubator, what basic features does your device need to have?
- Small and light-weight
- Uses small amounts of chemicals
- Gets to the right temperature and stays there long enough
- Can help support and protect the egg
Explain to students that possible problems that might prevent the design from successfully meeting all the criteria are called constraints.
Ask students:
What are some factors that might prevent the design from successfully meeting all these criteria?
- The chemicals might not produce the right temperature
- Might need a large amount of chemicals to make it work (too expensive and wasteful)
- The temperature might not stay in the right range long enough
2 Evaluate
The activity sheet will serve as the Evaluate component of this lesson. The activity sheets are formative assessments of student progress and understanding.
- Lesson 6.11 Student Activity Sheet PDF | DOCX | Google Doc
- Lesson 6.11 Activity Sheet Answers PDF | DOCX | Google Doc
The activity sheet will serve as the “Evaluate” component of each 5-E lesson plan. The activity sheets are formative assessments of student progress and understanding. A more formal summative assessment is included at the end of each chapter.
Students will record their observations and answer questions about the activity on the activity sheet. The Explain It with Atoms & Molecules and Take It Further sections of the activity sheet will either be completed as a class, in groups, or individually depending on your instructions. Look at the teacher version of the activity sheet to find the questions and answers.
3 Develop Possible Soultions
Step 4
Continue the story about rescuing reptile eggs and determine the incubation temperature requirement.
The student activity sheet returns to the story about transporting reptile eggs from a construction site to a reptile conservation center. Have students look at the text message as well as the reptile egg identification page on their activity sheet to identify whether these eggs belong to a snake, turtle, or lizard. Each type of reptile egg has a different incubation temperature requirement.
Ask students
- Do these eggs belong to a snake, turtle, or lizard?
Snake - How do you know?
Both lizard and snake eggs are laid on top of the ground, but snake eggs are larger. - What temperature range should you aim for when you develop your heat pack?
28-32 °C
Step 5
Have students begin developing their device by dissolving different amounts of calcium chloride in water.
Ask students
- Do you know of a chemical that gets hot when dissolved in water?
If students have done the activities in Chapter 5, they may remember that dissolving calcium chloride in water causes an increase in temperature. - How can you design a test to see if the amount of calcium chloride dissolved in water affects the temperature change?
Use the same amount of water but add different amounts of calcium chloride to see which causes the greater increase in temperature.
Question to Investigate
Does the amount of calcium chloride dissolved in water affect the temperature change?
You will need:
- Goggles
- 2 small thermometers
- Calcium chloride
- Baking soda (used in the second part of the procedure)
- Water
- 2 small clear plastic cups
- 1 graduated cylinder, medicine cup, or Tablespoon
- Measuring spoons (⅛ tsp., ¼ tsp. and ½ tsp.)
Note: The bulb of each thermometer must be completely submerged in order to accurately measure the temperature of the liquid. If using thermometers with a thin plastic backing, use scissors to clip the bottom off so that the bottom of the bulb aligns with the bottom of the backing. This allows you to use less liquid which allows for more dramatic changes in temperature.
Note: Complete steps 5 and 6 as soon as possible after step 4.
Procedure
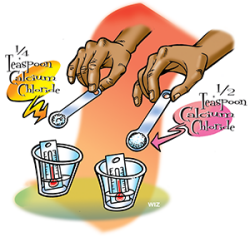
Dissolve calcium chloride
- Pour 15 mL of water into each of two small clear plastic cups.
- Place a small thermometer in each cup and record the initial temperature.
- With the help of a partner and at the same time, add ¼ tsp. of calcium chloride to one cup and ½ tsp. of calcium chloride to the other cup.
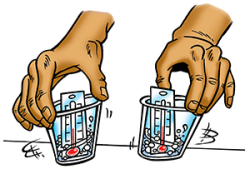
With the thermometers still in the cups, gently swirl both cups and check the temperature of both. Record the highest final temperature each reaches in the chart on the student activity sheet.
Expected Results
The solution with more calcium chloride increases to a higher temperature.
Note: Complete steps 5 and 6, found on the next page, as soon as possible after step 4. If students have worked with calcium chloride and baking soda before, ask the following questions before continuing the procedure.
Ask students
- Calcium chloride seems like it might be a good chemical for the heating part of the heat pack design, but what about the need to cushion and protect the egg? Is there something we could do to make the heat pack puffy?
Yes. Another substance could be added so the reaction also produces a gas. Production of the right amount of gas could make the heat pack into a little pillow which could cushion and protect the egg. But if too much gas is produced, the pack could pop or be too big to work well. - What do you think you could add to the calcium chloride solution to produce a gas?
Baking soda. In Chapter 6, Lesson 7, students added calcium chloride to a baking soda solution and saw it bubble. They could reasonably think that adding baking soda to a calcium chloride solution will do the same thing.
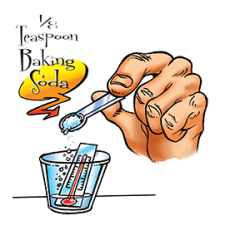
Add baking soda
- Add about ⅛ teaspoon of baking soda to the solution that reached the highest temperature. Watch the solution and the thermometer.
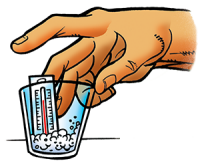
- With the thermometer still in the cup, gently swirl and check the temperature. Record the lowest final temperature reached.
Expected results
The solution bubbles and the temperature decreases.
Ask students
Since adding baking soda makes the temperature go down, does this mean that it should not be used in the design of the device?
Not necessarily. Maybe it can be used so that gas is produced but with enough calcium chloride to make the temperature high enough. There would need to be some kind of balance between the amount of calcium chloride and baking soda so that the right temperature is reached, and enough gas is produced to hold the egg in position and protect the egg.
Give students time to complete this page of their student activity sheet.
This may be a good stopping point for the first portion of this lesson.
Step 6
Have students test a combination of calcium chloride, baking soda, and water.
Tell students that they will combine calcium chloride, baking soda and water to try to get within the right range for snake eggs. First, they will mix the calcium chloride and baking soda together and then add this mixture to water.
Ask students
If the temperature is too high, what can you do? What if it is too low?
If the temperature is too high, either decrease the amount of calcium chloride, add more baking soda, or a combination of both. If the temperature is too low, either increase the amount of calcium chloride, add less baking soda, or a combination of both.
Question to investigate
About how much calcium chloride, baking soda, and water should be mixed to reach the right temperature to incubate snake eggs?
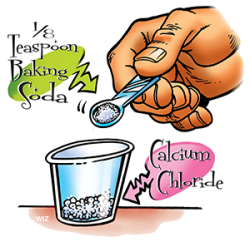
You will need
- Calcium chloride
- Baking soda
- Measuring spoons (⅛ tsp. and ½ tsp.)
- 2 small clear plastic cups
- Water
- Thermometer
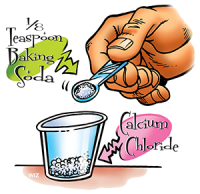
Procedure
- Place ½ tsp. of calcium chloride in a cup.
- To the same cup, add ⅛ tsp. of baking soda.
Swirl the cup to mix these dry ingredients as well as you can.
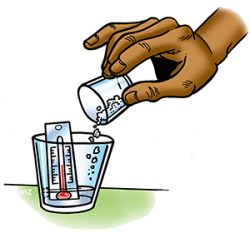
- In a separate cup, add 15 milliliters of water, place a thermometer in the cup, and record the temperature.
- With the thermometer in the cup, add all the calcium chloride and baking soda mixture and gently swirl to mix.
- Record the final temperature in the chart on the student activity sheet.
- Adjust the amount of calcium chloride and/or baking soda and try the reaction two more times to achieve the target temperature.
Expected results
There should be bubbling as the gas is produced. The temperature should increase and students should be able to get within the target range of 28-32 °C.
Ask students
About how much calcium chloride, baking soda, and water should be mixed to reach the right temperature range to incubate snake eggs?
Results will vary depending on the particular calcium chloride and baking soda you are using, accuracy of measuring tools and student measuring technique.
Step 7
Have students conduct their chemical reaction in a sealed bag as a prototype heat pack.
Remind students that their challenge is to make a heat pack to warm and safely transport snake eggs. Explain that next they will conduct the chemical reaction in a sealed bag to see if the temperature and amount of gas produced will do the job. Would the chemical reaction you tested in this lesson work if it were sealed in a plastic bag?
Sealing the chemicals in a plastic bag would mean that you would be able to bring just the portable reptile egg incubator with you rather than carry all the supplies needed for each of your tests. In this activity, students combine calcium chloride and baking soda in a zip-closing plastic bag to see if this design will keep reptile eggs warm.
Question to investigate
Does enough heat transfer through the bag to reach the right temperature range?
You will need
- Calcium chloride
- Baking soda
- Measuring spoons (⅛ tsp. and ½ tsp.)
- Graduated cylinder
- 2 small clear plastic cups
- Small zip-closing plastic bag
- Water
- Thermometer
Note: The bag will not inflate fully. By only partially inflating, the bag will serve as a better cushion and support for the egg.
Procedure
Combine chemicals in a cup
- Place the amount of calcium chloride and baking soda, which resulted in the best temperature from the previous procedure, in a cup.
- Swirl the cup to mix these two dry ingredients.

Prepare the bag
- Pour the combined powders into one corner of a small zip-closing plastic bag. Tilt the bag so that all the calcium chloride and baking soda stays in one corner.
- Use your fingers to seal off that part of the bag.
- Have your partner pour 15 milliliters water into the other corner of the bag so that the water does not touch the dry powders.
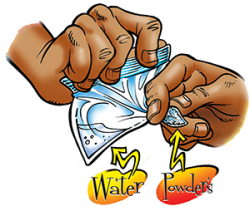
- While keeping the water and powders separated, try to get the air out of the bag as you close it and make sure that it is tightly sealed.
Start the chemical reaction
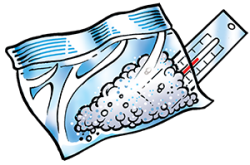
- Let go of the corner and tilt the bag so that the water and the powders mix and react.
- Position a thermometer under the bag so that the bulb is beneath the solution where the chemical reaction is taking place. Be sure you can read the temperature without having to remove the thermometer. Record the highest temperature reached in the chart on the activity sheet.
Expected results
There should be bubbling as the gas is produced and the bag inflates a bit. The bag should feel warm on the surface where the reaction is taking place and should get up to about 28-32 °C. If the outside of the bag does not get hot enough, students can do the reaction again with more calcium chloride.
Ask students
- Since the plastic bag will be part of the portable egg incubator, enough heat needs to transfer through the bag to the egg. Does enough heat transfer through the bag to warm a snake egg enough?
Yes. - The bag inflates slightly. How could this feature be useful in the design of the portable egg incubator?
If we place the bag under, around, or on top of the egg, it may be able to hold the egg in place so that it is not flipped, turned, or jostled when it is being transported.
3 Optimize the Design
Step 8
Discuss features of a portable snake egg incubator that could maintain the temperature for as long as possible and keep eggs properly positioned.
The lesson, so far, has focused on a chemical reaction which would reach a temperature to keep one snake egg warm, but not too warm. Students will need to think of a way or ways they could keep the heat generated in the chemical reaction around the egg during the time it is transported. Once the chemical reaction is over, it will no longer generate heat. So, students will need to consider using some sort of insulation in their device.
Because reptile eggs must remain in the position they are found, the device should ensure that the egg is not turned or jostled too much. Perhaps the partially inflated bag students experimented with could be used to hold the eggs in position. Help students think about how they might build their snake egg protection device.
Ask students
- How will you incorporate the partially inflated bag so that the egg is supported?
The bag could be placed in a paper, plastic, or Styrofoam cup so that the bottom of the bag would be insulated, and the egg could be placed on top of the bag in the cup. - What are some ways you could keep the egg and the inflated bag warm for as long as possible?
The container that the bag and egg are placed in will insulate to a certain extent. Perhaps torn paper, paper towels, or a lid could keep the egg warm for a longer time.
Have each student or group design a model snake egg protection device.
Students will draw their device and answer the following questions:
- How does your device keep an egg at the ideal temperature for as long as possible?
- How does your device hold an egg in the proper orientation?
- How does your device protect an egg from impact?
The story below concludes the lesson. Students will find the same story on the last page of their student activity sheet.
Reptiles rescued!
Congratulations, your device works! It was used to take the snake eggs from the construction site safely to the reptile conservation center. The eggs were carefully placed in incubators and both the temperature and humidity were ideal for the growth of healthy snakes.
Because most reptiles can feed and take care of themselves as soon as they hatch, the baby snakes will be taken to a new location and released into the wild. There they will make their new home as they strive to survive and thrive.
What is the 5-E format?
The 5-E instructional model is an approach to teaching and learning that focuses on active engagement, inquiry-based learning, and collaboration.
Downloads
For Students
- Lesson 6.11 Student Activity Sheet PDF | DOCX | Google Doc
For Teachers
- Lesson 6.11 Lesson Plan PDF | DOCX | Google Doc
- Lesson 6.11 Activity Sheet Answers PDF | DOCX | Google Doc
Resources for the entire Chapter 6
- Chapter 6 Student Reading PDF | DOCX | Google Doc
- Chapter 6 Test Bank PDF | DOCX | Google Doc
Have Questions? Visit Help Center
