Density: Sink and Float for Liquids
Lesson Summary Video for teachers
Note: This video is designed to help the teacher better understand the lesson and is NOT intended to be shown to students. It includes observations and conclusions that students are meant to make on their own.
Key Concepts
- Since density is a characteristic property of a substance, each liquid has its own characteristic density.
- The density of a liquid determines whether it will float on or sink in another liquid.
- A liquid will float if it is less dense than the liquid it is placed in.
- A liquid will sink if it is more dense than the liquid it is placed in.
Summary
Students will observe three household liquids stacked on each other and conclude that their densities must be different. They will predict the relative densities of the liquids and then measure their volume and mass to see if their calculations match their observations and predictions.
Objective
Students will be able to determine whether a liquid will sink or float in water by comparing its density to the density of water.

Safety
Make sure you and your students wear properly fitting goggles. When using isopropyl alcohol, read and follow all warnings on the label. Isopropyl alcohol is flammable. Keep it away from any flames or spark sources. Have students wash hands after the activity.
Materials for Each Group
- Balance
- Isopropyl alcohol, 70% or higher
- Water
- Graduated cylinder
- 2 identical tall clear plastic cups
- 2 tea light candles
Materials for the Demonstration
- Balance
- Isopropyl alcohol, 70% or higher
- Water
- Graduated cylinder
- 2 identical tall clear plastic cups
- 2 tea light candles
Notes about the Materials
Isopropyl alcohol
The demonstrations and activity work best with 91% isopropyl alcohol solution, which is available in many grocery stores and pharmacies. If you can’t find 91% solution, 70% will work, but your candle might not sink in it. If that happens, do not do that demonstration. Although the isopropyl alcohol solution is 91% alcohol and 9% water, you can disregard the small amount of water for the purpose of this lesson.
Balance
A simple balance is all that is required for the second demonstration. One of the least expensive is Delta Education, Stackable Balance (21-inch) Product # 020-0452. Students can use the smaller version of the same balance, Delta Education, Stackable Balance (12-inch), Product # 023-0724.
Download All Lesson Resources
Get the entire lesson plan and Student Activity Sheet for "Lesson 3.5 - Density: Sink and Float for Liquids."
Online Assignments
Supplement in-class learning with interactive, multimedia-rich Google Forms lesson modules, perfect for reinforcing key chemistry concepts and scientific investigation skills.
Instructions
1 Engage
Step 1
Do two demonstrations to show that different liquids have different densities.
Materials
- Balance
- Isopropyl alcohol, 70% or higher
- Water
- Graduated cylinder
- 2 identical tall clear plastic cups
- 2 tea light candles
Teacher preparation
- Use a graduated cylinder to measure 50 mL of water and pour it into a clear plastic cup.
- Measure 50 mL of isopropyl alcohol and pour it into another identical clear plastic cup.

Procedure
Demonstrate the density of two liquids with sinking and floating
- Place a tea light candle in a cup with water and another tea light candle in a cup with alcohol.
- Hold up the two cups.
Expected results
The candle will float on water and sink in alcohol.
Ask students:
- What might be causing one candle to float and the other to sink?
Explain that the two candles are the same. Students should reason that the liquids must be different and have different densities. Explain that the cup with the floating candle contains water and the cup with the sinking candle contains isopropyl alcohol. - Do you think these two liquids have the same or different densities?
Students should conclude that the liquids must have different densities. They may even realize that water is more dense and alcohol is less dense than the wax candle.

Procedure
Demonstrate the density of two liquids by comparing the mass of equal volumes
- Remove the candles from each liquid and tell students that each cup contains the same volume of liquid.
- Carefully place the cups of water and alcohol on opposite ends of a balance.
Expected results
The water will weigh more than the alcohol.
Ask students:
- Which liquid is more dense?
Students should agree that the water is more dense than the alcohol. - How do you know?
Since the water has more mass than an equal volume of alcohol, water must be more dense.
2 Evaluate
Give each student an activity sheet.
- Lesson 3.5 Student Activity Sheet PDF | DOCX | Google Doc
- Lesson 3.5 Activity Sheet Answers PDF | DOCX | Google Doc
Download the student activity sheet, and distribute one per student.
The activity sheet will serve as the “Evaluate” component of each 5-E lesson plan. The activity sheets are formative assessments of student progress and understanding. A more formal summative assessment is included at the end of each chapter.
Students will record their observations and answer questions about the activity on the activity sheet. The Explain It with Atoms and Molecules and Take It Further sections of the activity sheet will either be completed as a class, in groups, or individually depending on your instructions. Look at the teacher version of the activity sheet to find the questions and answers.
3 Explore
Step 2
Demonstrate that liquids can float or sink in other liquids by making a density column with water, oil, and alcohol.
Materials for the demonstration
- Graduated cylinder
- Water
- Vegetable oil
- Isopropyl alcohol, 70% or higher
Note: If you would like the liquids to be more visible, add 1 drop of food coloring to the water and another drop of a different color to the alcohol.

Procedure
- Pour about 15 mL of water into the graduated cylinder. Gradually add about 15 mL of oil. Then slowly pour about 15 mL of alcohol on top. The liquids should form layers in the graduated cylinder.
- Show students the layered liquids in the graduated cylinder and point out that the alcohol floats on the oil while the water sinks.
Expected results
Alcohol floats on oil and water sinks in oil. Water, alcohol, and oil layer well because of their densities, but also because the oil layer does not dissolve in either liquid. The oil keeps the water and alcohol separated so that they do not dissolve in one another.
Ask students:
- Why does the alcohol float on the oil?
They should conclude that the alcohol floats because it is less dense than the oil. - Why does the water sink in the oil?
Water sinks because it is more dense than oil. Explain that, just like solids, liquids are made from atoms and molecules, which have a certain mass and size. Depending on the mass of the molecules that make up a liquid and how closely they pack together, liquids have their own densities. - In the activity, you will compare the mass of equal volumes of each liquid. Which liquid do you think will have the most mass? The least mass? In between?
Students should predict that the water will weigh the most, the alcohol will weigh the least, and the vegetable oil will weigh somewhere in between.
Step 3
Calculate the density of water, alcohol, and oil.
Question to investigate
Why does water sink in oil and alcohol float in oil?
Materials for each group
- Water
- Vegetable oil
- Isopropyl alcohol (70% or higher)
- Graduated cylinder
- Balance that measures in grams
This activity is written for students to make actual measurements of the mass and volume and to calculate the density of each liquid. Emphasize to students that they should be sure to accurately measure the volume and mass of each liquid.
Procedure
- Find the mass of an empty graduated cylinder. Record the mass in grams in the chart on the activity sheet.
- Pour 20 mL of water into the graduated cylinder. Try to be as accurate as possible by checking that the meniscus is right at the 20 mL mark.
- Weigh the graduated cylinder with the water in it. Record the mass in grams.
- Find the mass of only the water by subtracting the mass of the empty graduated cylinder. Record the mass of 20 mL of water in the chart.
- Use the mass and volume of the water to calculate density. Record the density in g/cm3 in the chart.
- Follow steps 2–5 for alcohol and then oil. Be sure to measure the oil last because it does not rinse easily from the graduated cylinder.
| Water | Alcohol | Oil |
Mass of graduated cylinder + liquid (g) |
|
|
|
Mass of empty graduated cylinder (g) |
|
|
|
Mass of liquid (g) |
|
|
|
Density of liquid (g/cm3) |
|
|
|
Step 4
Discuss whether the calculated densities support the order the liquids layer in the graduated cylinder.
Ask students:
- Do the densities you calculated explain why liquids float and sink in one another? Explain.
Yes, the water is the most dense and sinks in the oil. The alcohol is the least dense and floats on the oil.
4 Explain
Step 5
Compare the density of water, alcohol, and oil on the molecular level.
Depending on the mass and size of the molecules that make up different liquids and how closely they pack together, liquids have their own characteristic densities.
Project the image Oil
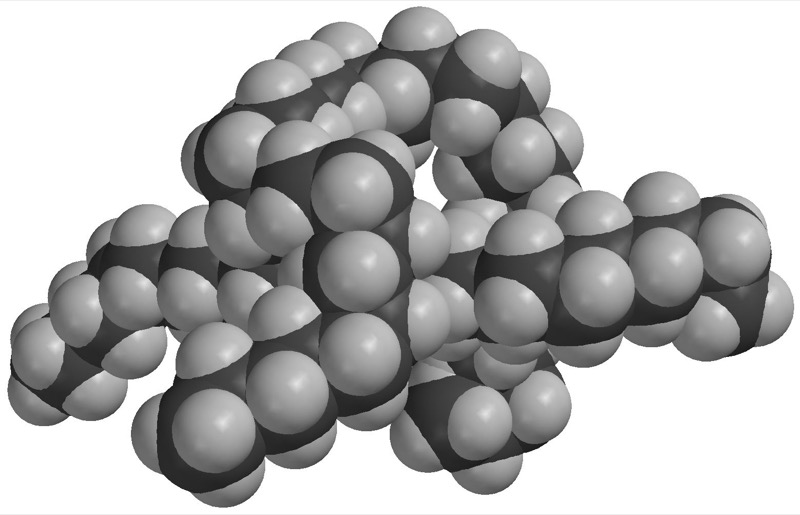
Tell students that molecules of oil are mostly made of carbon and hydrogen atoms bonded together.
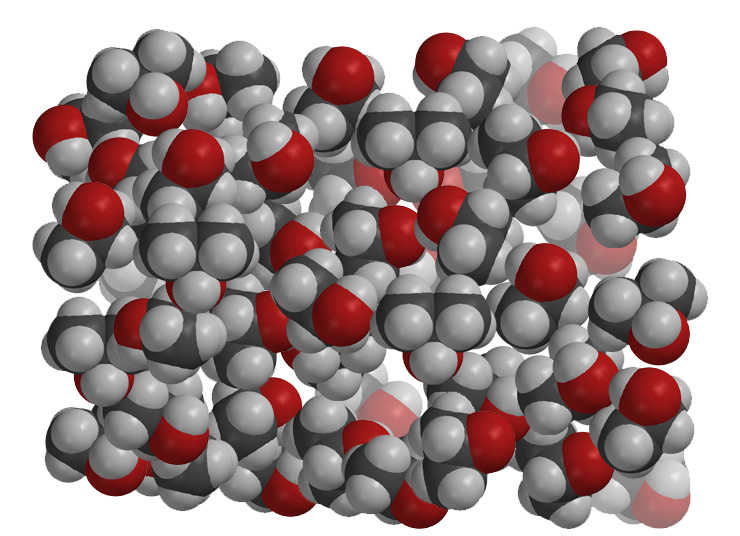
Project the image Water

Water molecules are made up of oxygen and hydrogen atoms bonded together. Oxygen is heavier and smaller than carbon, so a volume of water molecules is heavier than the same volume of oil molecules. This makes water more dense than oil. Also, water molecules are very attracted to each other and pack very close together. This is another reason why water is more dense than oil.
Project the image Alcohol
Alcohol is less dense than oil. Alcohol molecules are mostly carbon and hydrogen atoms so they are similar to oil. But they also contain an oxygen atom, which makes them a little heavy. For this reason, you might think that alcohol would be more dense than oil. But alcohol molecules do not pack very tightly together. Because of their shape and size, alcohol molecules do not pack as efficiently as oil molecules, making alcohol less dense than oil.
5 Extend
Step 6
As a demonstration, change the density of water so that a sinking carrot slice floats.
You may choose to do the following either as a demonstration or as an activity that students can do.
Materials
- Tall clear plastic cup
- Water
- Carrot slice about ¼ inch thick
- Salt
- Spoon
Procedure
- Pour water into a clear tall plastic cup until it is about ½-filled.
- Place a slice of carrot in the water.
Ask students:
- Is the carrot more or less dense than the water?
Since the carrot sinks, students should conclude that the carrot is more dense than water.

- Add about 1 teaspoon of salt to the water and stir. Continue to stir until the carrot floats to the surface of the salt water. If the carrot does not float to the surface, add more salt and stir.
Expected results
The slice of carrot should float in the saltwater.
Ask students:
- Is it more or less dense than saltwater?
Since the carrot floats in saltwater, students should conclude that the carrot is less dense than saltwater. - How does adding salt change the density of the water?
Dissolving salt in water increases both the mass and volume of the water, but it increases the mass more. Because D = m/v, increasing the mass more than the volume results in an increase in density. - What would you expect if you placed equal volumes of water and saltwater on opposite ends of a balance?
If equal volumes of water and saltwater were placed on a balance, the saltwater would be heavier.
What is the 5-E format?
The 5-E instructional model is an approach to teaching and learning that focuses on active engagement, inquiry-based learning, and collaboration.
Downloads
For Students
- Lesson 3.5 Student Activity Sheet PDF | DOCX | Google Doc
For Teachers
- Lesson 3.5 Lesson Plan PDF | DOCX | Google Doc
- Lesson 3.5 Activity Sheet Answers PDF | DOCX | Google Doc
Resources for the entire Chapter 3
- Chapter 3 Student Reading PDF | DOCX | Google Doc
- Chapter 3 Test Bank PDF | DOCX | Google Doc
Interactive Lesson Modules
- Lesson 3.5 Online Assignments Google Form
Have Questions? Visit Help Center