Changing State—Condensation
Lesson Summary Video for teachers
Note: This video is designed to help the teacher better understand the lesson and is NOT intended to be shown to students. It includes observations and conclusions that students are meant to make on their own.
Key Concepts
- Condensation is the process in which molecules of a gas slow down, come together, and form a liquid.
- When gas molecules transfer their energy to something cooler, they slow down, and their attractions cause them to join together to become a liquid.
- Making water vapor colder increases the rate of condensation.
- Increasing the concentration of water vapor in the air increases the rate of condensation.
Summary
Students investigate the condensation of water vapor on the inside of a plastic cup. Then they design an experiment to see if cooling water vapor even more affects the rate of condensation. Students also relate evaporation and condensation to the water cycle.
Objective
Students will be able to describe on the molecular level how cooling water vapor causes condensation. Students will also describe the roles evaporation and condensation play in the water cycle.

Safety
Be sure you and the students wear properly fitting goggles.
Materials for Each Group
- 1 short wide-rimmed clear plastic cup
- 1 tall smaller-rimmed clear plastic cup
- Hot water (about 50 °C)
- Magnifier
Materials for the Demonstration
- 2 clear plastic cups
- Room-temperature water
- Ice cubes
- Gallon-size zip-closing plastic bag
About this Lesson
Try the demonstration before presenting it to your students. It will not work if the humidity is too low. You could instead show students the following video:
The activity for the students will work no matter how dry or humid the air.
Download All 2.3 Lesson Resources
Get the entire lesson plan and Student Activity Sheet for "Lesson 2.3 - Changing State—Condensation."
Online Assignments
Supplement in-class learning with interactive, multimedia-rich Google Forms lesson modules, perfect for reinforcing key chemistry concepts and scientific investigation skills.
Instructions
1 Engage
Step 1
Prepare for the demonstration about 5–10 minutes before class.
Materials for the demonstration
- 2 clear plastic cups
- Room-temperature water
- Ice cubes
- Gallon-size zip-closing plastic bag

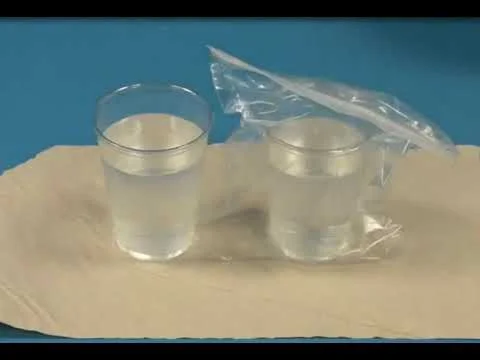
- Place water and ice cubes into two identical plastic cups.
- Immediately place one of the cups in a zip-closing plastic bag and get as much air out of the bag as possible. Close the bag securely.
- Allow the cups to sit undisturbed for about 5–10 minutes.
Expected results
The cup inside the bag should have very little moisture on it because not much water vapor from the air was able to contact it. The cup exposed to air should have more moisture on the outside because it was exposed to the water vapor in the air, which condensed on the outside of the cup.
Step 2
Show students the two cold cups of water and ask why water appears on the outside of only one of them.
Show students the two cups you prepared and ask:
- Which cup has the most moisture on the outside of it?
Students should realize that the cup exposed to more air has the most moisture on the outside of it. - Why do you think the cup that is exposed to more air has more water on the outside of it?
Make sure students understand that this moisture came from water vapor in the air that condensed on the outside of the cup. Remind students that water vapor is one of the gases that makes up air. The cup in the bag has very little to no moisture on it because it is exposed to much less air. Less air means less water vapor. - Some people think that the moisture that appears on the outside of a cold cup is water that has leaked through the cup. How does this demonstration prove that this idea is not true?
Because there is little to no moisture on the outside of the cup in the bag, students should conclude that water could not have leaked through the cup. If the moisture came from leaking, there would be water on the outside of both cups.
Step 3
Introduce the process of condensation.
If students do not know what the process of condensation is, you can tell them it is the opposite of evaporation. In evaporation, a liquid (like water) changes state to become a gas (water vapor). In condensation, a gas (like water vapor) changes state to become a liquid (water).
Explain that as water molecules in the air cool and slow down, their attractions overcome their speed and they join together, forming liquid water. This is the process of condensation.
Ask students:
- What are some examples of condensation?
Coming up with examples of condensation is a bit harder than examples of evaporation. One common example is water that forms on the outside of a cold cup or the moisture that forms on car windows during a cool night. Other examples of condensation are dew, fog, clouds, and the fog you see when you breathe out on a cold day. - You may have made a cold window “cloudy” by breathing on it and then drawn on the window with your finger. Where do you think that cloudiness comes from?
Help students realize that the moisture on the window, and all of the examples of condensation they gave, comes from water vapor in the air. - A real cloud is made up of tiny droplets of water. Where do you think they come from?
The water in a cloud comes from water vapor in the air that has condensed.
2 Evaluate
Give each student an activity sheet.
- Lesson 2.3 Student Activity Sheet PDF | DOCX | Google Doc
- Lesson 2.3 Activity Sheet Answers PDF | DOCX | Google Doc
Download the student activity sheet, and distribute one per student.
The activity sheet will serve as the “Evaluate” component of each 5-E lesson plan. The activity sheets are formative assessments of student progress and understanding. A more formal summative assessment is included at the end of each chapter.
Have students answer questions about the demonstration on the activity sheet. They will also record their observations and answer questions about the activity. The Explain It with Atoms & Molecules and Take It Further sections of the activity sheet will either be completed as a class, in groups, or individually depending on your instructions. Look at the teacher version of the activity sheet to find the questions and answers.
3 Explore
Step 4
Have students collect a sample of water vapor and observe the process of condensation.
Question to investigate
What happens when water vapor condenses?
Materials for each group
- 1 short wide-rimmed clear plastic cup
- 1 tall smaller-rimmed clear plastic cup
- Hot water (about 50°C)
- Magnifier
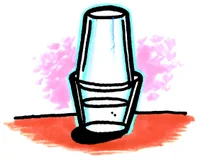
- Fill a wide clear plastic cup about 2/3 full of hot tap water. Place the tall cup upside down inside the rim of the bottom cup as shown.
- Watch the cups for 1–2 minutes.
- Use a magnifier to look at the sides and top of the top cup.
- Take the top cup off and feel the inside surface.
Expected results
The top cup will become cloudy-looking as tiny drops of liquid water collect on the inside surface of the cup.
Step 5
Discuss with students what they think is happening inside the cups.
Ask students:
- What do you think is on the inside of the top cup?
Students should agree that the inside of the top cup is coated with tiny drops of liquid water. - How do you think the drops of water on the inside of the top cup got there?
Students should realize that some of the water in the cup evaporated, filling the inside of the top cup with invisible water vapor. Some of this water vapor condensed into tiny drops of liquid water when it condensed on the inside of the top cup.
Explain that water vapor leaves the hot water and fills the space above, contacting the inside surface of the top cup. Energy is transferred from the water vapor to the cup, which cools the water vapor. When the water vapor cools enough, the attractions between the molecules bring them together. This causes the water vapor to change state and become tiny drops of liquid water. The process of changing from a gas to a liquid is called condensation.
4 Explain
Step 6
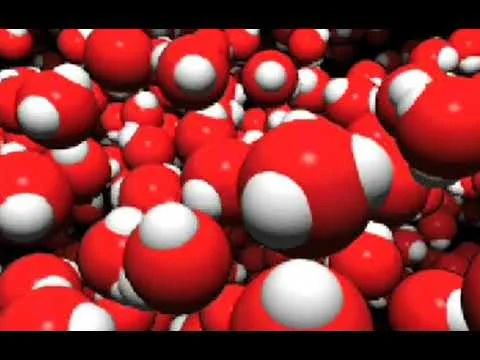
Show an animation to help students understand what happens when gases condense to their liquid state.
Show the animation Condensation.

Explain that the fast-moving molecules of water vapor transfer their energy to the side of the cup, which is cooler. This causes the water vapor molecules to slow down. When they slow down enough, their attractions overcome their speed and they stay together as liquid water on the inside surface of the cup.
Read more about evaporation and condensation in the Teacher Background.
- Lesson 2.3 Teacher Background PDF
Step 7
Discuss how to design an experiment to find out whether increased cooling of the water vapor affects the rate of condensation.
The goal of this discussion is to help students better understand the experimental design outlined in the procedure.
Ask students:
How could we set up an experiment to see if making water vapor even colder affects the rate of condensation?
- How can we get the water vapor we need for this experiment?
Students may suggest collecting water vapor as in the previous activity or collecting it over a pot of boiling water or some other way. - Will we need more than one sample of water vapor? Should we cool one sample of water vapor, but not the other?
Help students understand that they will need 2 samples of water vapor, only one of which is cooled. - How will we cool the water vapor?
Students may have many ideas for cooling water vapor, like placing a sample in a refrigerator or cooler filled with ice or placing a sample of water vapor outside if the weather is cool enough. - How will you know which sample of water vapor condensed faster?
By comparing the size of the drops of water formed in both samples, students can determine whether cooling water vapor increases the rate of condensation.
Step 8
Have students do an activity to find out whether cooling water vapor increases the rate of condensation.
Question to investigate
Does making water vapor colder increase the rate of condensation?
Materials for each group
- 2 short wide-rimmed clear plastic cups
- 2 tall smaller-rimmed clear plastic cups
- Hot water (about 50 °C)
- Magnifier
- Ice

- Fill two wide clear plastic cups about 2/3 full of hot tap water.
- Quickly place the taller cups upside down inside the rim of each cup of water, as shown.
- Place a piece of ice on top of one of the cups.
- Wait 2–3 minutes.
- Remove the ice and use a paper towel to dry the top of the cup where the ice may have melted a bit.
- Use a magnifier to examine the tops of the two upper cups.
Expected results
There will be bigger drops of water on the inside of the top cup below the ice.
Step 9
While waiting for results, have students predict whether increased cooling will increase the rate of condensation.
Ask students to make a prediction:
- What effect do you think adding the ice cube will have on the rate of condensation?
- Explain on the molecular level, why you think extra cooling might affect the rate of condensation.
Step 10
Discuss students’ observations and draw conclusions.
Ask students:
- Which top cup appears to have more water on it?
The cup with the ice. - Why do you think the cup with the ice has bigger drops of water on the inside than the cup without ice?
When the water vapor is cooled by the ice, the water molecules slow down more than in the cup without the ice. This allows their attractions to bring more molecules together to become liquid water. - Does cooling water vapor increase the rate of condensation?
Yes.
What evidence do you have from the activity to support your answer?
Students should realize that the bigger drops of water on the top cup with the ice indicate a greater amount of condensation. Because the water vapor in both sets of cups was condensing for the same length of time, the water vapor in the cup with the bigger drops must have condensed at a faster rate.
Step 11
Explain examples of condensation on the molecular level.
Ask students:
- Fogging up a cold window
When you breathe out, there is water vapor in your breath. When you breathe on a cold window in the winter, the window gets tiny droplets of moisture on it or “fogs up.”
What happens to the molecules of water vapor as they get near the cold window?
The water molecules in your breath are the gas water vapor. They slow down as they transfer some of their energy to the cold window. The attractions between the slower-moving water vapor molecules bring them together to form tiny droplets of liquid water. - Warm breath in cold air
When you breathe out in the winter, you see “smoke,” which is really a fog of tiny droplets of liquid water.
What happens to the molecules of water vapor from your breath when they hit the cold air?
The water vapor in your breath is warmer than the outside air. The water vapor molecules transfer energy to the colder air. This makes the water vapor molecules move more slowly. Their attractions overcome their motion and they join together or condense to form liquid water.
Step 12
Explain to students that the evaporation and condensation occur naturally in the water cycle.
Project the image Water Cycle from the activity sheet.

One common place you see the results of evaporation and condensation is in the weather. Water vapor in the air (humidity), clouds, and rain are all the result of evaporation and condensation. What happens to the water molecules during the evaporation and condensation stages of the water cycle?
Energy from the sun causes water to evaporate from the land and from bodies of water. As this water vapor moves high into the air, the surrounding air cools it, causing it to condense and form clouds. The tiny droplets of water in clouds collect on bits of dust in the air. When these drops of water become heavy enough, they fall to the ground as rain (or hail or snow). The rain flows over the land towards bodies of water, where it can evaporate again and continue the cycle
Step 13
Introduce the idea that the amount of water vapor in the air affects the rate of condensation.
Ask students if they know what a terrarium is. Tell students that a terrarium is a closed container with moss or other plants in which water continually evaporates and condenses. At first, the evaporation rate is higher than the rate of condensation. But as the concentration of water molecules increases in the container, the rate of condensation increases. Eventually, the rate of condensation equals the rate of evaporation, and the water molecules go back and forth between the liquid and the gas.
Show the animation Evaporation & Condensation
Explain that the animation moves up through a sample of water to the surface. Water molecules evaporate (leave the liquid) and condense (reenter the liquid) at the same time.
The animation shows the beginning of the process where water molecules evaporate at a faster rate than they condense. Explain to students that if the process were to continue, the rate of evaporation and condensation would become equal.
So, temperature isn’t the only factor that affects condensation. The concentration of water molecules in the air is also an important factor. The higher the concentration of water molecules in the air (humidity), the higher the rate of condensation.
This is why clothes dry more slowly on a humid day. The high concentration of water vapor in the air causes water to condense on the clothes. So even though water is evaporating from the clothes, it is also condensing on them and slowing down the drying.
Read more about evaporation and condensation equilibrium in the Teacher Background.
- Lesson 2.3 Teacher Background PDF
Step 14
Have students design an activity to see why wind helps things dry more quickly.
Explain to students that when water evaporates from something like a paper towel, the area in the air immediately above the paper towel has a little extra water vapor in it from the evaporating water. Some of this water vapor condenses back onto the paper so the paper doesn’t dry as quickly. If that water vapor is blown away by moving air like wind, there will be less condensation and the paper will dry more quickly.
Ask students:
- How would you design an experiment that can test whether a paper towel dries more quickly if the air around the paper towel is moving?
As you listen to suggestions from students, be sure that they identify and control variables. The paper should be in the same situation except for air moving over one piece but not the other. It is not a good idea to blow on one because the breath could be a different temperature than the surrounding air and also contains water vapor. These are both variables that would affect the experiment. It is better to wave one of the paper towels back and forth for a few minutes and have someone else hold the other or tape it so it hangs freely.
Materials
- 2 pieces of brown paper towel
- Water
- Dropper
Procedure
- Place one drop of water on two pieces of brown paper towel.
- Have your partner hold one paper while you swing the other one through the air.
- After about 30 seconds compare the paper towels to see if you can see any difference in how wet or dry the papers are.
- Repeat step 3 until you notice a difference between the wet spots on the paper towels.
Expected results
The water on the paper towel with more air moving over it should dry faster than the other paper towel on the table. The paper towel on the table had air with a little more humidity over it condensing back onto the paper. This slowed down the drying process. The paper waved in the air didn’t have humid air around it and condensing back on it as much, so it dried more quickly.
6 Extra Extend
Step 15
Use the processes of evaporation and condensation to purify water.
Evaporation and condensation can be used to purify water. Imagine what might happen if colored water evaporates and then condenses.
Question to investigate
If colored water evaporates and condenses, will there be any color in the water that is produced?
Materials for each group
- 1 short wide-rimmed clear plastic cup
- 1 tall smaller-rimmed clear plastic cup
- Hot water
- Food coloring
- Ice cube
- White napkin or paper towel

Procedure
- Add hot tap water to a wide clear plastic cup until it is about 2/3 full.
- Add 1 drop of food coloring and stir until the water is completely colored.
- Turn another clear plastic cup upside down on the cup of hot water as shown. Place an ice cube on the top cup to make condensation happen faster.
- Wait 1–3 minutes for water vapor to condense to liquid water on the inside surface of the top cup.
- Use a white paper towel to wipe the inside of the cup to check for any color.
Expected results
The water that collects on the inside of the top cup will be colorless. The color will remain in the bottom cup. Explain that the process described in the procedure is called distillation. In distillation, water containing dissolved substances can be purified (as long as these substances don’t easily evaporate). When the water evaporates and condenses, the food coloring is left behind and the pure water can be collected and used.
What is the 5-E format?
The 5-E instructional model is an approach to teaching and learning that focuses on active engagement, inquiry-based learning, and collaboration.
Downloads
- Lesson 2.3 Student Activity Sheet PDF | DOCX | Google Doc
For Teachers
- Lesson 2.3 Lesson Plan PDF | DOCX | Google Doc
- Lesson 2.3 Activity Sheet Answers PDF | DOCX | Google Doc
- Lesson 2.3 Teacher Background PDF
Resources for the entire Chapter 2
- Chapter 2 Student Reading PDF | DOCX | Google Doc
- Chapter 2 Test Bank PDF | DOCX | Google Doc
Interactive Lesson Modules
- Lesson 2.3 Online Assignments Google Form
Have Questions? Visit Help Center