Changing State—Evaporation
Lesson Summary Video for teachers
Note: This video is designed to help the teacher better understand the lesson and is NOT intended to be shown to students. It includes observations and conclusions that students are meant to make on their own.
Key Concepts
- Evaporation occurs when molecules in a liquid gain enough energy that they overcome attractions from other molecules and break away to become a gas.
- Adding energy increases the rate of evaporation.
- To conduct a valid experiment, variables need to be identified and controlled.
Summary
Students will help design an experiment to see if adding energy (heating) affects the rate of evaporation. Students will look at molecular animations to help explain why heating water increases the rate of evaporation. Students will be introduced to a more detailed model of the water molecule. Students will create 3-D Styrofoam models of water molecules.
Objective
Students will be able to identify and control variables to design a test to see if heating water affects the rate of evaporation. Students will be able to explain, on the molecular level, why adding energy increases the rate of evaporation.

Safety
Make sure you and your students wear properly fitting goggles. Use caution when handling hot water.
Materials for Each Group
- 2 quart-size zip-closing plastic storage bags
- Hot water
- Room-temperature water
- 2 squares of brown paper towel
- 2 droppers
Materials for each student
- 2 Styrofoam balls (11/2-inch)
- 4 Styrofoam balls (1-inch)
- 2 flat toothpicks
- School glue
- Permanent marker
Download All Lesson 2.2 Resources
Get the entire lesson plan and Student Activity Sheet for “Lesson 2.2 - Changing State—Evaporation."
Online Assignments
Supplement in-class learning with interactive, multimedia-rich Google Forms lesson modules, perfect for reinforcing key chemistry concepts and scientific investigation skills.
Instructions
1 Engage
Step 1
Predict what might happen to a wet paper towel by the end of the class.
Show students two pieces of brown paper towel. Dampen one with water so that the color appears darker than the dry piece of paper towel. Select a student to feel the difference between the two paper towels now, and again at the end of the class period. Place both paper towels up in a prominent location.
Ask students:
- At the end of class, do you think the paper towel will still be wet or will it be dry?
Students should agree that the wet paper towel will likely become dry. They may say that the water will evaporate. Explain to students that when water evaporates, it changes from a liquid to a gas. Point out that the word “evaporate” has the word “vapor” in it—water changes to water vapor but it is still water. - What are some other examples of evaporation?
Students may think of common examples of evaporation such as clothes in a dryer, wet hair drying on its own, or a puddle drying up in the sun. - When water evaporates, where do the water molecules go?
Make it clear that, although you can’t see the water anymore after it has dried up or evaporated, it still exists. The water molecules separate from one another and are in the air as a gas called water vapor.
Tell students that they are going to find out what happens to water molecules as they evaporate by exploring how to make water evaporate faster.
Step 2
Help students design an experiment to find out whether adding energy increases the rate of evaporation.
Tell students that they will test the evaporation of just 1 drop of water on a brown paper towel so that they can see results quickly.
Ask students:
- What could you do to make a small amount of water evaporate faster from a paper towel?
Students will know that they should somehow heat the water on the paper towel. - Will you need to put a drop of water on just one paper towel or on two?
As you listen to students, help them realize that they will need to wet two paper towel samples but that only one will be heated. The unheated paper towel is the “control.” If they wet two paper towels and heat one of them, they will be able to see whether adding energy (heating) affects the rate of evaporation.
2 Evaluate
Give each student an activity sheet.
- Lesson 2.2 Student Activity Sheet PDF | DOCX | Google Doc
- Lesson 2.2 Activity Sheet Answers PDF | DOCX | Google Doc
Download the student activity sheet, and distribute one per student.
The activity sheet will serve as the “Evaluate” component of each 5-E lesson plan. The activity sheets are formative assessments of student progress and understanding. A more formal summative assessment is included at the end of each chapter.
Students will record their observations and answer questions about the activity on the activity sheet. The Explain It with Atoms & Molecules and Take It Further sections of the activity sheet will either be completed as a class, in groups, or individually depending on your instructions. Look at the teacher version of the activity sheet to find the questions and answers.
3 Explore
Step 3
Have students conduct an experiment to see if adding energy increases the rate of evaporation.
Question to investigate:
Does adding energy increase the rate of evaporation?
Materials for each group
- 2 quart-size zip-closing plastic storage bags
- Hot water (about 50 °C)
- Room-temperature water
- 2 squares of brown paper towel
- 2 droppers
Procedure
- Add room-temperature water to a zip-closing plastic bag until it is about ¼-filled. Get as much air out as possible and seal the bag securely. Lay the bag down flat.
- Add hot tap water to a different zip-closing plastic bag until it is about ¼-filled. Get as much air out as possible and seal the bag securely. Lay the bag down flat. This bag will serve as an energy source.
The bag with the room-temperature water will serve as the control.

- Place 2 pieces of paper towel on your table. You and your partner should each use a dropper to place 1 drop of room-temperature water in the center of each piece of paper towel at the same time.
- Allow the drops to spread for about 5–10 seconds until they don’t seem to be spreading any more.

- At the same time, place one paper towel on each bag.
- Observe every few minutes. Compare the amount of water on each paper towel.
Expected results
The water mark on the brown paper lying on the hot water bag should disappear faster than the mark on the paper lying on the room-temperature water bag. This will take about 3–5 minutes.
Step 4
While waiting for evaporation, discuss the design of this experiment.
While students are waiting to see which drop of water evaporates faster, ask students about the design of the experiment.
Ask students:
- How did we control variables?
- Why did we use the same type of paper towel for each sample?
- Why did we put the same amount of water on each piece of paper towel?
- Both drops of water on the paper towels were originally the same temperature. Was this a good idea?
- Why did we put the drops on the paper towel at the same time and in the same area?
The type of paper towel material, amount of water, initial temperature of the water, and where the water is placed on the paper towel may all have an effect on the rate of evaporation. All these different factors are variables in the experiment. All these variables need to be kept the same so that the experiment is as fair as possible.
- Why did we place one paper towel on a bag filled with room-temperature water?
Even the surface each paper towel is placed on should be the same. This is why one paper towel is placed on a room-temperature bag instead of on a room-temperature table or desk. The only difference should be the amount of energy the paper towels are exposed to.
Be sure students understand the purpose of the control. The control is necessary because if there was only one sample that was heated, there would be nothing to compare it with. There would be no way of knowing whether adding energy made any difference in the rate of evaporation if there wasn’t another sample to compare it to that was not heated.
Step 5
Discuss student observations.
Ask students:
- Does adding energy increase the rate of evaporation? How do you know?
Yes. We can say that heating water increases the rate of evaporation because the drop of water that was heated evaporated first. Since the experiment controlled variables, heating water must increase the rate of evaporation. - Knowing what you do about energy and molecular motion, why do you think the water that was heated evaporated faster?
Students should remember that adding energy increases the motion of molecules.
They should realize that the water molecules on the paper towel on the warm bag are moving faster than the ones on the room-temperature bag. Students should conclude that more of these faster-moving molecules break away from the other molecules and go into the air.
4 Explain
Step 6
Show an animation to explain why adding energy increases the rate of evaporation.
Show the animation Evaporation.
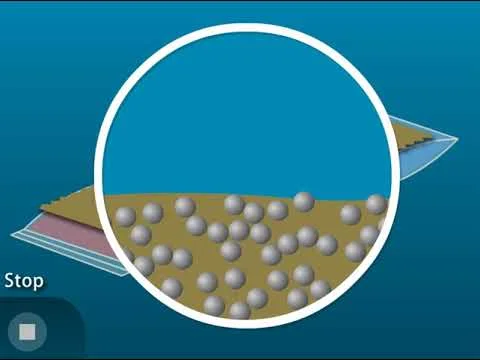
Tell students that adding energy to the water on the paper towel increases the motion of the water molecules. When the molecules have enough energy, they can move fast enough to break away from the attractions holding them to other molecules.
Step 7
Have students describe their observations on the molecular level.
Project the image Heating and Evaporation from the activity sheet.


Point out the difference in the number of motion lines in the water on each paper towel. Explain that the heated water molecules have more energy and move faster than the room-temperature water. These faster moving molecules are able to overcome the attractions they have for other water molecules and evaporate.
Have students include words or phrases with these pictures to indicate why heating the water on the paper towel increases the rate of evaporation.
Step 8
Look at the paper towels from the start of the lesson.
Have the student who felt the two pieces of brown paper towel at the beginning feel them again. This student should report that the moist paper towel is drier or is completely dry.
Ask students:
- The wet paper towel was not heated. Why did the water evaporate?
Remind students of the model of average kinetic energy they saw in the last lesson. Explain to students that at room temperature, water molecules are moving at a variety of different speeds, but most are moving fast enough to evaporate. As the molecules transfer energy between each other, even slower molecules will gain enough energy to evaporate.
Step 9
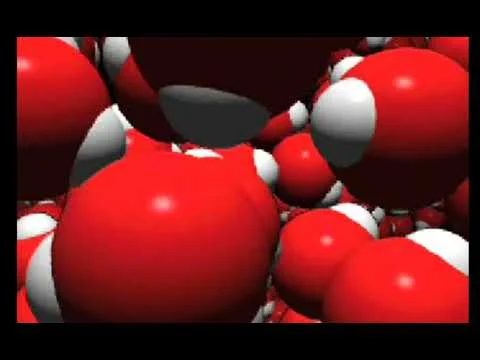
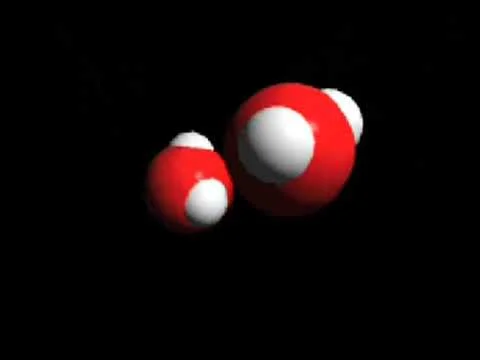
Show a different model of a water molecule and review changes in state using this model.
Tell students that they have been using a very simple model of water as just a circle or sphere but there are other models of water that show more detail about the structure of the molecule.
Show the animation of Models of Water Molecules.

Show students that a water molecule is made up of 1 oxygen atom (red) and 2 hydrogen atoms (gray). Point out the ball and stick model and the space-filling model.


The ball-and-stick model is used to highlight the angles at which the atoms are bonded together within a molecule. The space-filling model is used to highlight the space taken up by the electron cloud around the atoms within a molecule.
The shape of the water molecule and its attraction to other water molecules give water its characteristic properties.
Project animation Liquid water.
Explain that water molecules, as a liquid, are very close together because of their attractions for one another but are able to slide past each other.
Note: You can mention to students that when water molecules attract each other, the oxygen part of one water molecule attracts the hydrogen part of another. The reason for this will be explored in detail in Chapter 5.
Project animation Water vapor.
Explain that water molecules, as a gas, are much further apart and usually just bounce off each other when they collide. Be sure to point out that when the water evaporated, the molecules themselves did not break apart into atoms. The molecules separated from other molecules but stayed intact as a molecule.
5 Extend
Step 10
Have students make their own space-filling models of water molecules using Styrofoam balls.
Have each student make 2 water molecules. Let students know that these water molecules will be used to model the changes of state of water in later lessons.
Materials note:
Styrofoam balls are available from craft stores and many science suppliers. You will need 1-inch and 1½-inch balls. Each student will need 2 large and 4 small Styrofoam balls to make 2 water molecules each.
Point out that the large Styrofoam ball represents the oxygen atom and that the smaller Styrofoam balls represent the hydrogen atoms. Explain that the vast majority of each ball represents the electron cloud around the atom. Although it cannot be seen in the Styrofoam ball model, the center of each ball represents the extremely tiny nucleus where the protons and neutrons are. Almost the entire ball, except for the extremely tiny center, represents the area where the electrons are.
Materials for each student
- 2 Styrofoam balls (11/2-inch)
- 4 Styrofoam balls (1-inch)
- 2 flat toothpicks
- School glue
- Permanent marker
Procedure
- Break toothpicks in half so that there are 4 half-toothpicks.
- Use a permanent marker to write an “O” on each of the large balls and an “H” on each of the small balls.
- Push a half-toothpick about halfway into each small ball.

- Push two small balls onto each larger ball at the angle shown.
- Add 1 or 2 drops of glue where the hydrogen atoms meet the oxygen atoms. Allow the glue to dry overnight.
- Have students contribute their two water molecules to the group.
What is the 5-E format?
The 5-E instructional model is an approach to teaching and learning that focuses on active engagement, inquiry-based learning, and collaboration.
Downloads
- Lesson 2.2 Student Activity Sheet PDF | DOCX | Google Doc
For Teachers
- Lesson 2.2 Lesson Plan PDF | DOCX | Google Doc
- Lesson 2.2 Activity Sheet Answers PDF | DOCX | Google Doc
Resources for the entire Chapter 2
- Chapter 2 Student Reading PDF | DOCX | Google Doc
- Chapter 2 Test Bank PDF | DOCX | Google Doc
Interactive Lesson Modules
- Lesson 2.2 Online Assignments Google Form
Have Questions? Visit Help Center